Pictures by Peter Matusov (except where noted otherwise)
Pictures by Peter Matusov (except where noted otherwise)
It's only been a little over 15 years since the last Discovery Series 2 rolled off the assembly line, and as Disco Series 1 and 2, Range Rover Classics, and P38A Range Rovers started to disappear from the junkyards, the prices for replacement mechanical and electrical parts slowly started getting into the realm of reasonable. One can even buy a new (!) starter for anything made by Land Rover for North-American market between 1987 and 2002 for barely over sixty bucks.
So, in general, rebuilding a starter is a waste of time - you shouldn't be driving anything made by Land Rover if you can't blow two bottles of Jameson on a starter.
However, if you're like me, you have a pile of used kind of flaky starters that you can't bring yourself to toss in the trash. I can even be craftier with the reasons - if you are planning an overland trip of gargantuan dimensions in space and time, you have to be very picky about what you keep in your spares box and what you don't. Earlier I already elaborated on rebuilding an alternator - a pile of spares for an alternator only cost about forty bucks and weighs half a pound - a lot of money, space, and weight saving for not lugging around a spare unit.
The same argument goes for the starter. If a field-installable parts kit can be obtained, why not?
But before I commit myself to weight savings, I need to check if I can get parts, if they fit, if I can install them, and the starter is better than before.
Now, what are we talking about?
First, part number.
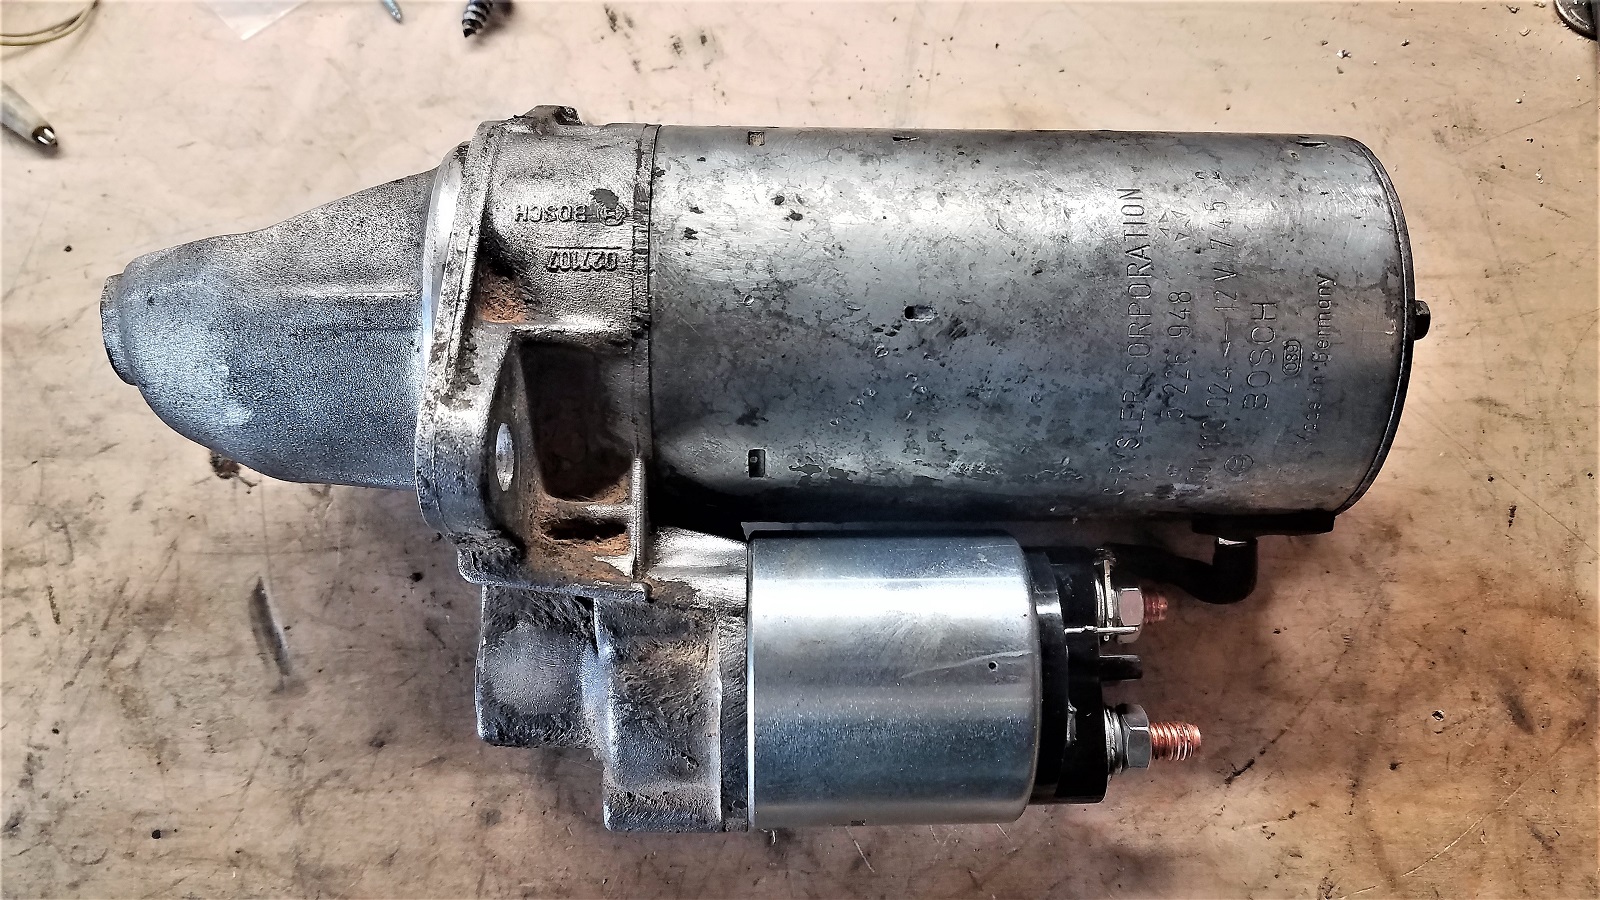
As anything from any vehicle, there is a legion - for the same part. Latest entry from Antlantic British reads RTC6061N; my recent huge favorite, Maniac Electric Motors is far more verbose:
BOSCH STARTER #'S 01109040, 187-0779, 0-001-109-040, SR0801X, 111865, S-6171, 410-24045, NAD101190, NAD101490, LRT00169, 12445, 17683, VS470, 17453N, 17792N, 2-1899-BO, 2-2714-BO-2, 91-15-7105, SBO0060, 187-0467, 0-001-110-120, SR0801X, 111865, S-6171, ERR6087, ERR6087E, LRT00169, 17705, 17317, STR-2228, 458253, VS470, 567808, 17453N, 17792N, 2-2714-BO-2, 91-15-7039: LESTER 17792 / PIC # 120-387
Your starter may be made or labelled "Land Rover," "Bosch," "Lucas," have no name, or, in this particular case, "Chrysler Corporation." And "Bosch," for clarity.
I may be over-generalizing here, but my guess is that the same part will fit everything that used Buick 215 derivatives (3.5, 3.9, 4.2, 4.0, 4.6) within NAS years of 1987 to 2002.
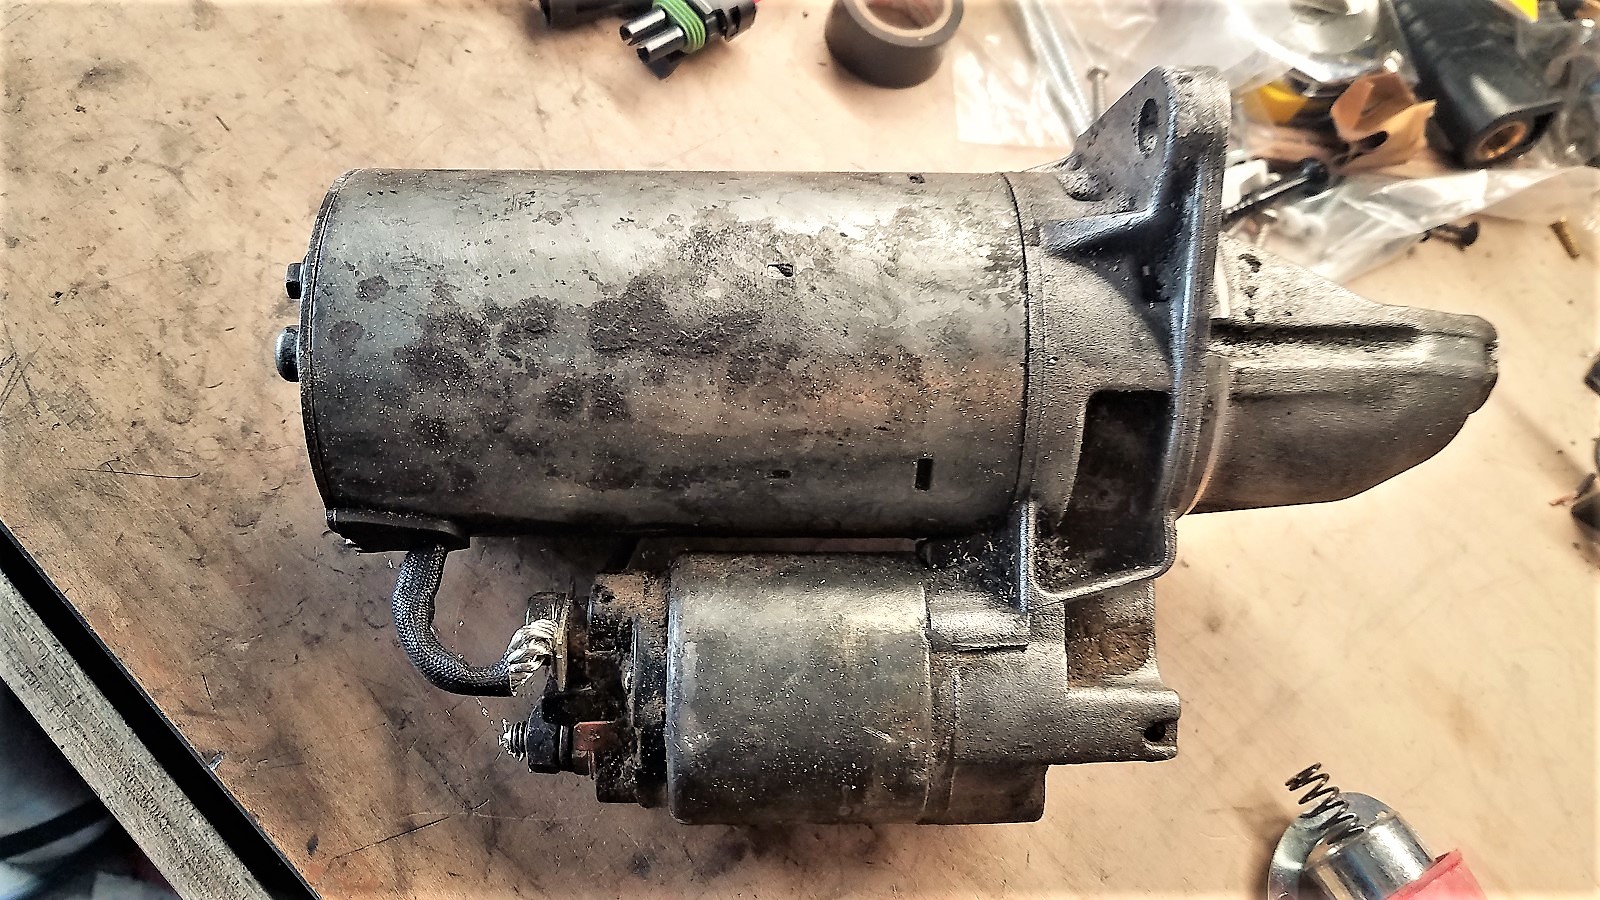
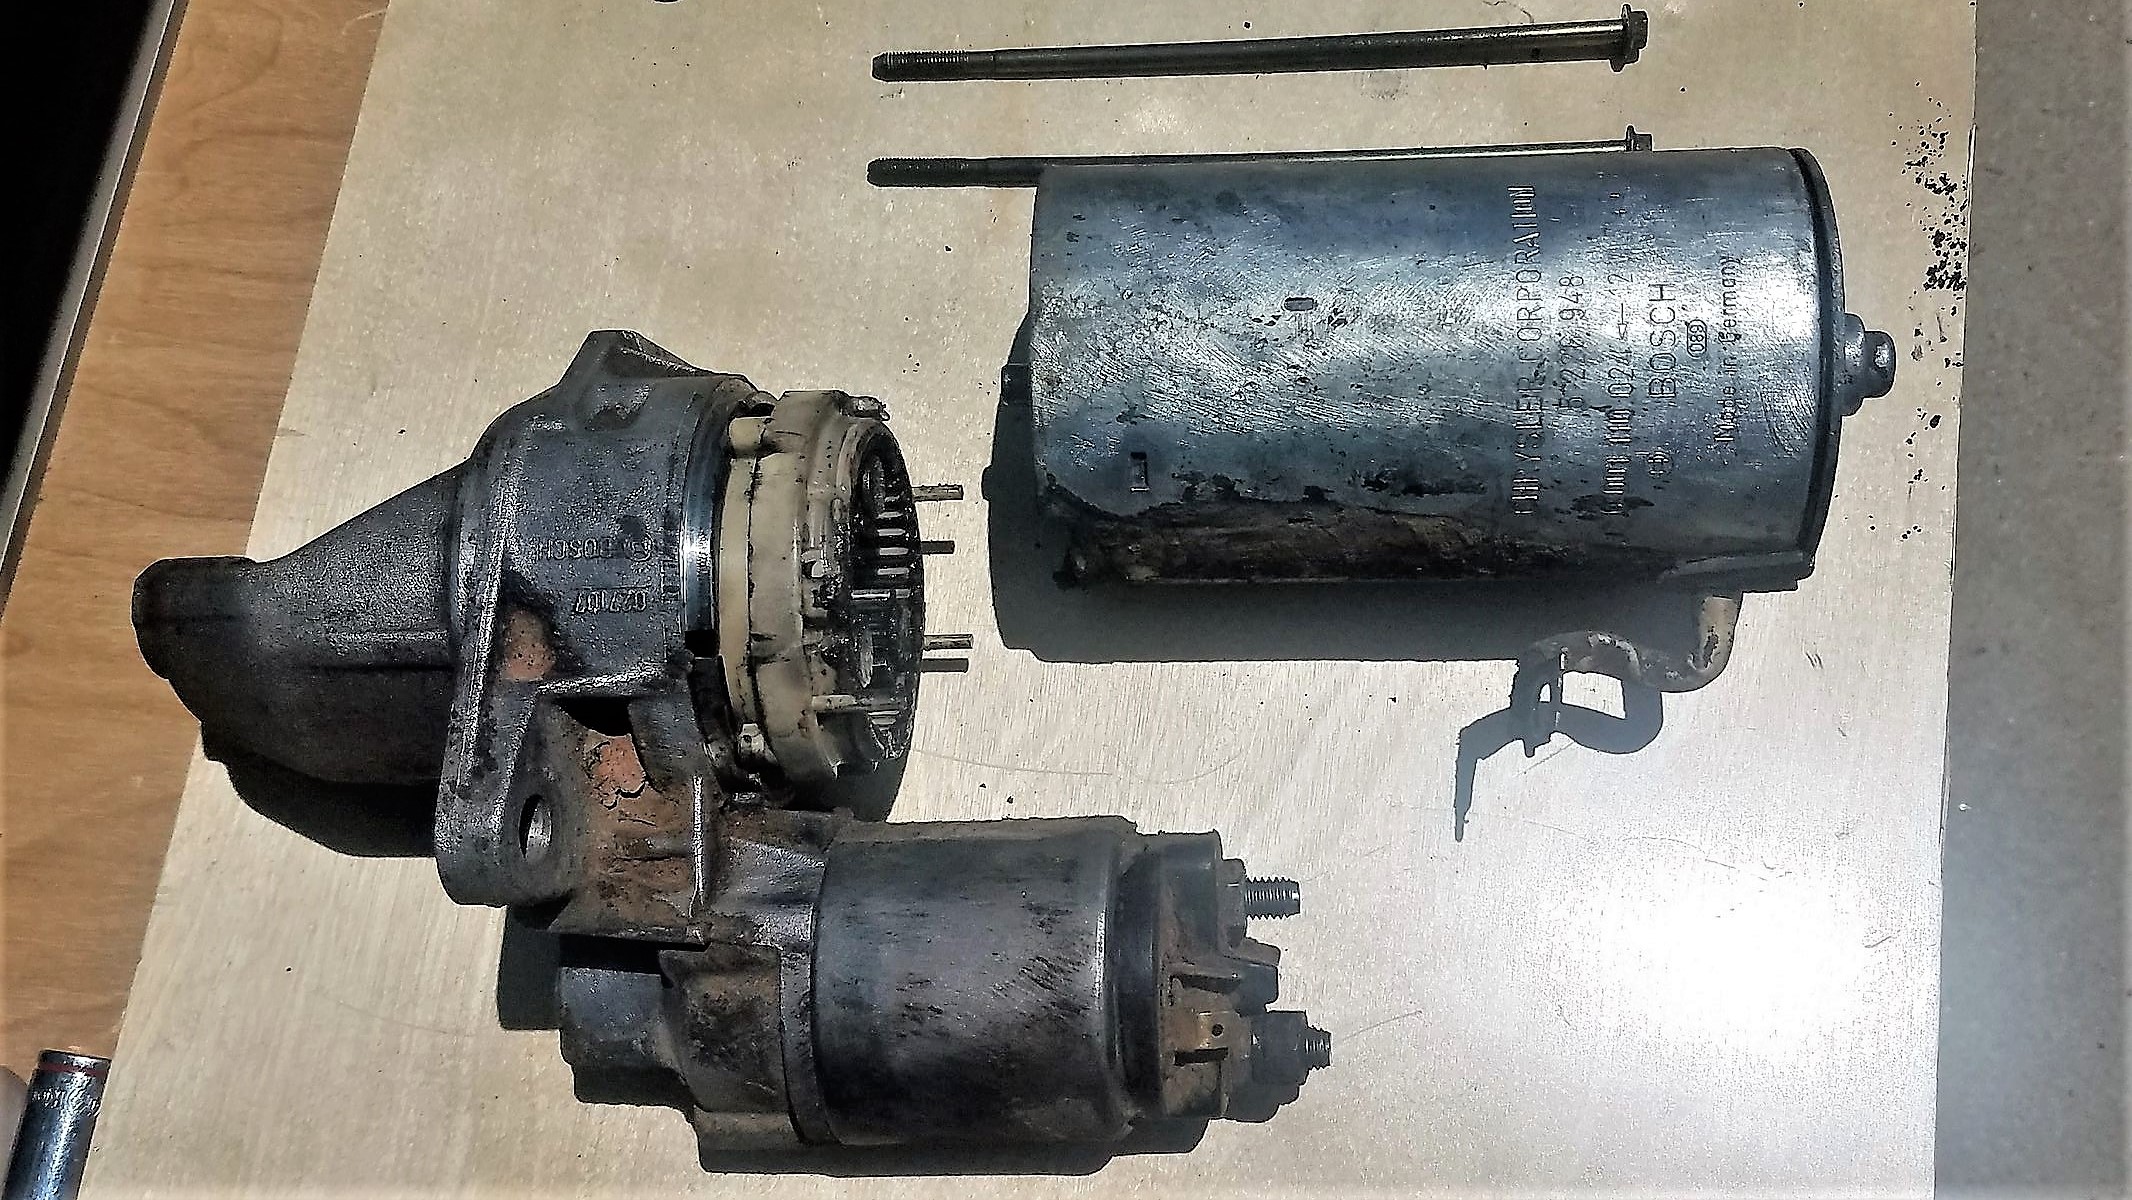
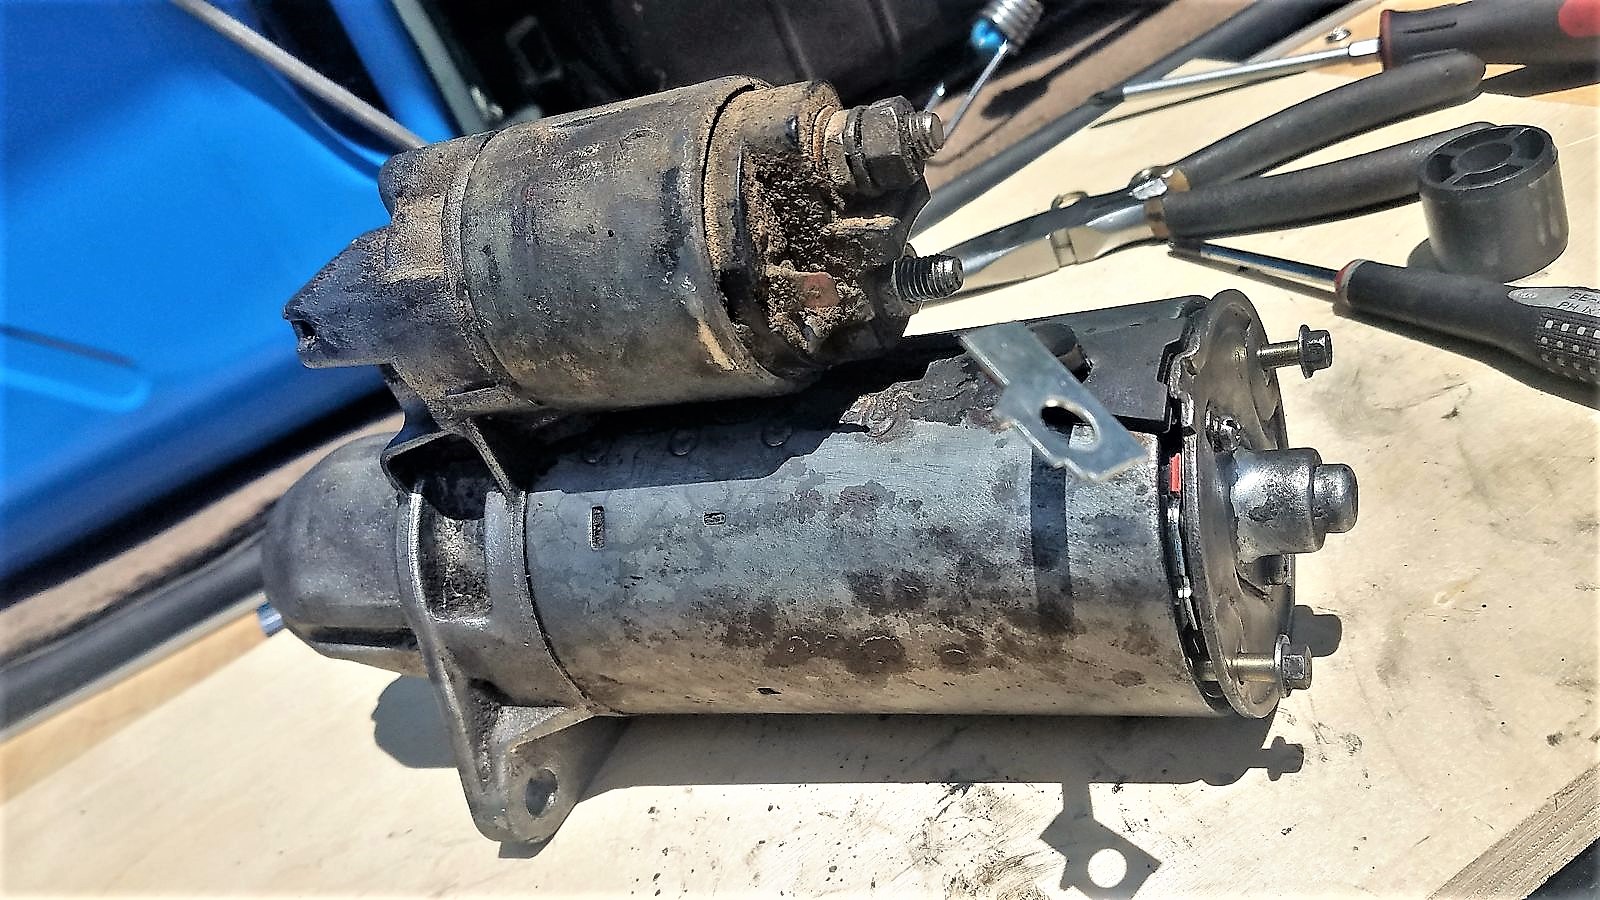
The turd on my bench looks shiny because it was so crusty that I took a wire wheel to it. A lot of fine Utah/Arizona/Nevada/Colorado/New Mexico dust well mixed with motor oil and turned into rust-preventing slurry by the heat of exhaust manifold nearby. Your starter may vary in color - from black paint liberally plastered by a cheap rebuilder to black slurry leaking down from under the passenger-side valve cover gasket.
If you already have it in hand, skip the next section; if you don't - you need to extract your starter from your truck. It is accomplished in a few simple steps:
Starter removal from the vehicle
- Disconnect the battery (negative terminal will do). Skipping this step will test your ability to yank a 13-mm box wrench free before it welds itself to the engine block.
- Have a beer. You won't be able to have another one for a little while.
-
Use the 13mm box wrench or socket to disconnect the fat wire from the fat terminal on the starter.
You'll be working in neat confines in close vicinity of the front diff, axle, and sharp-edged suspension and frame parts. After replacing a handful of starters, I am convinced that your best bet is on the ex-Soviet Army tank helmet, but I never got around to procure one ($55 on Amazon).

By the way, the nut may also be half-inch, or 12 or 14 millimeters - so have these wrenches nearby.
- Next, pull the solenoid control connector off the blade terminal next to that fat nut.
-
All electrical connections are now off, it is the fun time with the starter bolts. For these, you need - typically - an 8-mm Allen driver.
The bottom bolt is relatively easy to access, so getting it off will lend you a false sense of accomplishment. The feat of removing the top bolt - if you don't do it on a regular basis - is far more advanced. Give your creativity a workout: the top bolt can be removed with a combination of a (very long) L-shaped driver, short or long 8-mm driver with short or long extension, ratchet, and assorted wrenches used as breaker bars.
If you only engage the driver by a fraction of millimeter because the hex hole is filled with oily mud and strip the bolt, it is time to enjoy another beer, because now you need to remove the exhaust manifold and drive to the store for a set of EZ-outs.
-
Once the bolts are out and wires - out of the way, you can remove the starter.
Oh no... there's that heat shield on the way. Unlike most proper warm-blooded American heat shields held on by the spring clips on lesser vehicles (that would have long since been gone), Land Rover one uses a machine screw holding it tight to the right-side engine mount bracket. It is a bitch to get to, and even when you undo this bolt, you'll have to exersize your spatial imagination to wiggle it out.
If that's any consolation, be happy it is not an Audi.
- Now you have your starter.
My sincere apologies for such a lengthy diatribe - but it still blows me away that I could replace a starter on a Buick 350 V8 in a Jeep in 15 minutes at the parking lot, and it has never taken me less than an hour in a Land Rover with a Buick 215+.
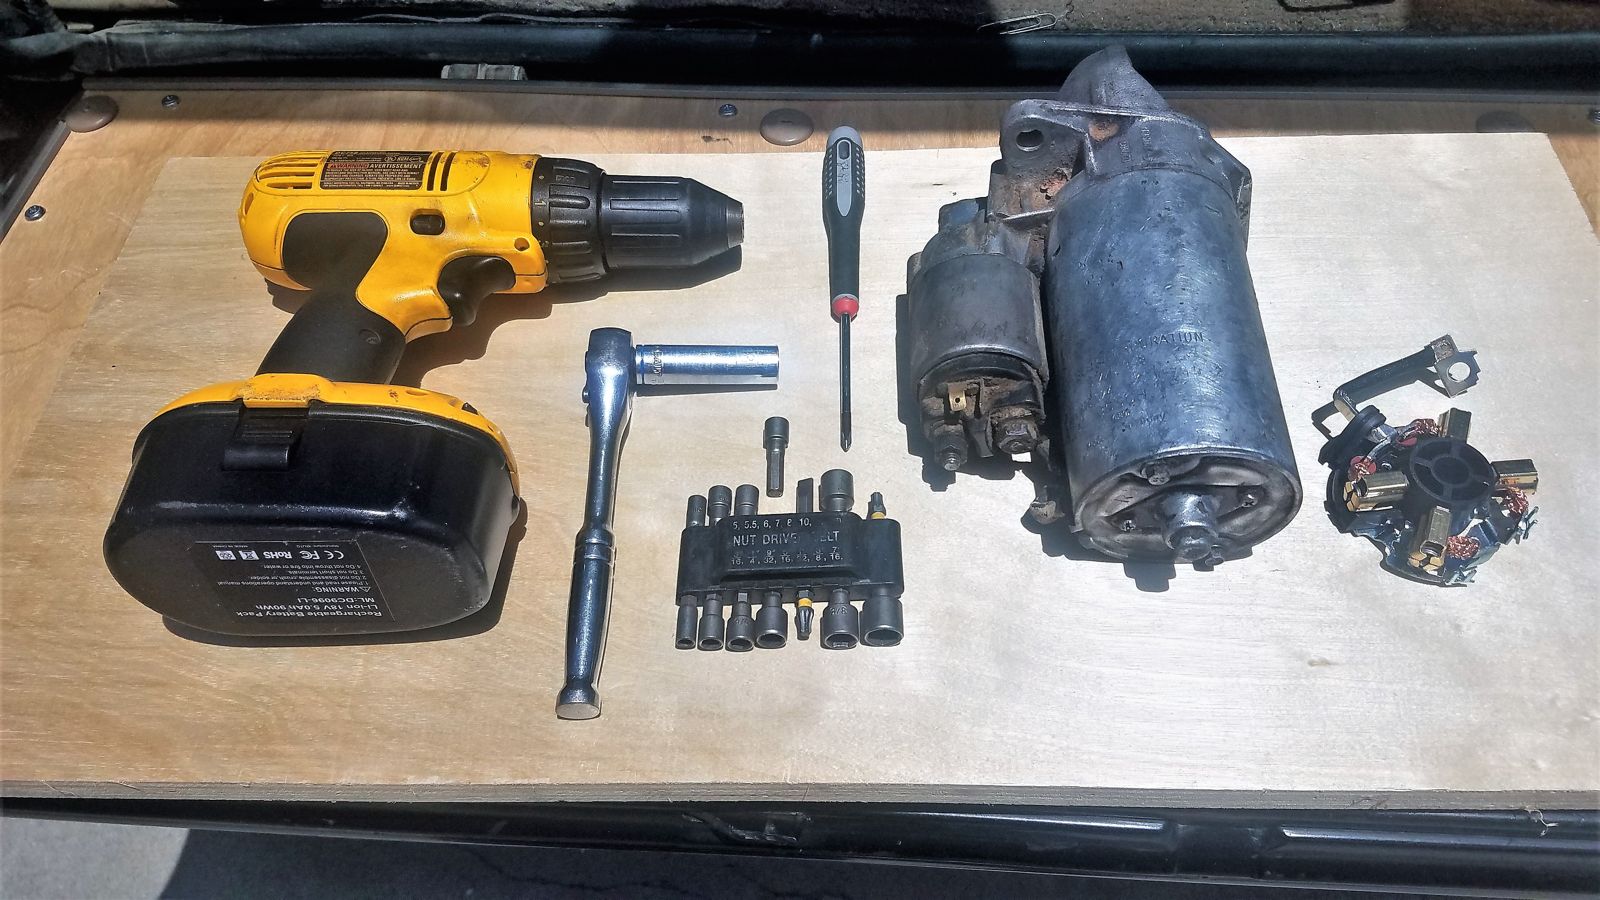
OK, let's take the starter apart.
You don't need a whole lot of tools: a 13-mm nut driver (or, as I mentioned above, maybe a 12mm, half-inch, or a 14mm), a 7-mm nut driver (no US substitutes!), and a Philips screwdriver. You may need a flathead screwdriver and a hammer later, but these are optional.
... with a caveat: most likely, we don't need to break it down into tiny pieces.
Here's a photo of what it would look like if you took it apart like Sean Campbell in Chicago (who's photo I shamelessly appropriated here):
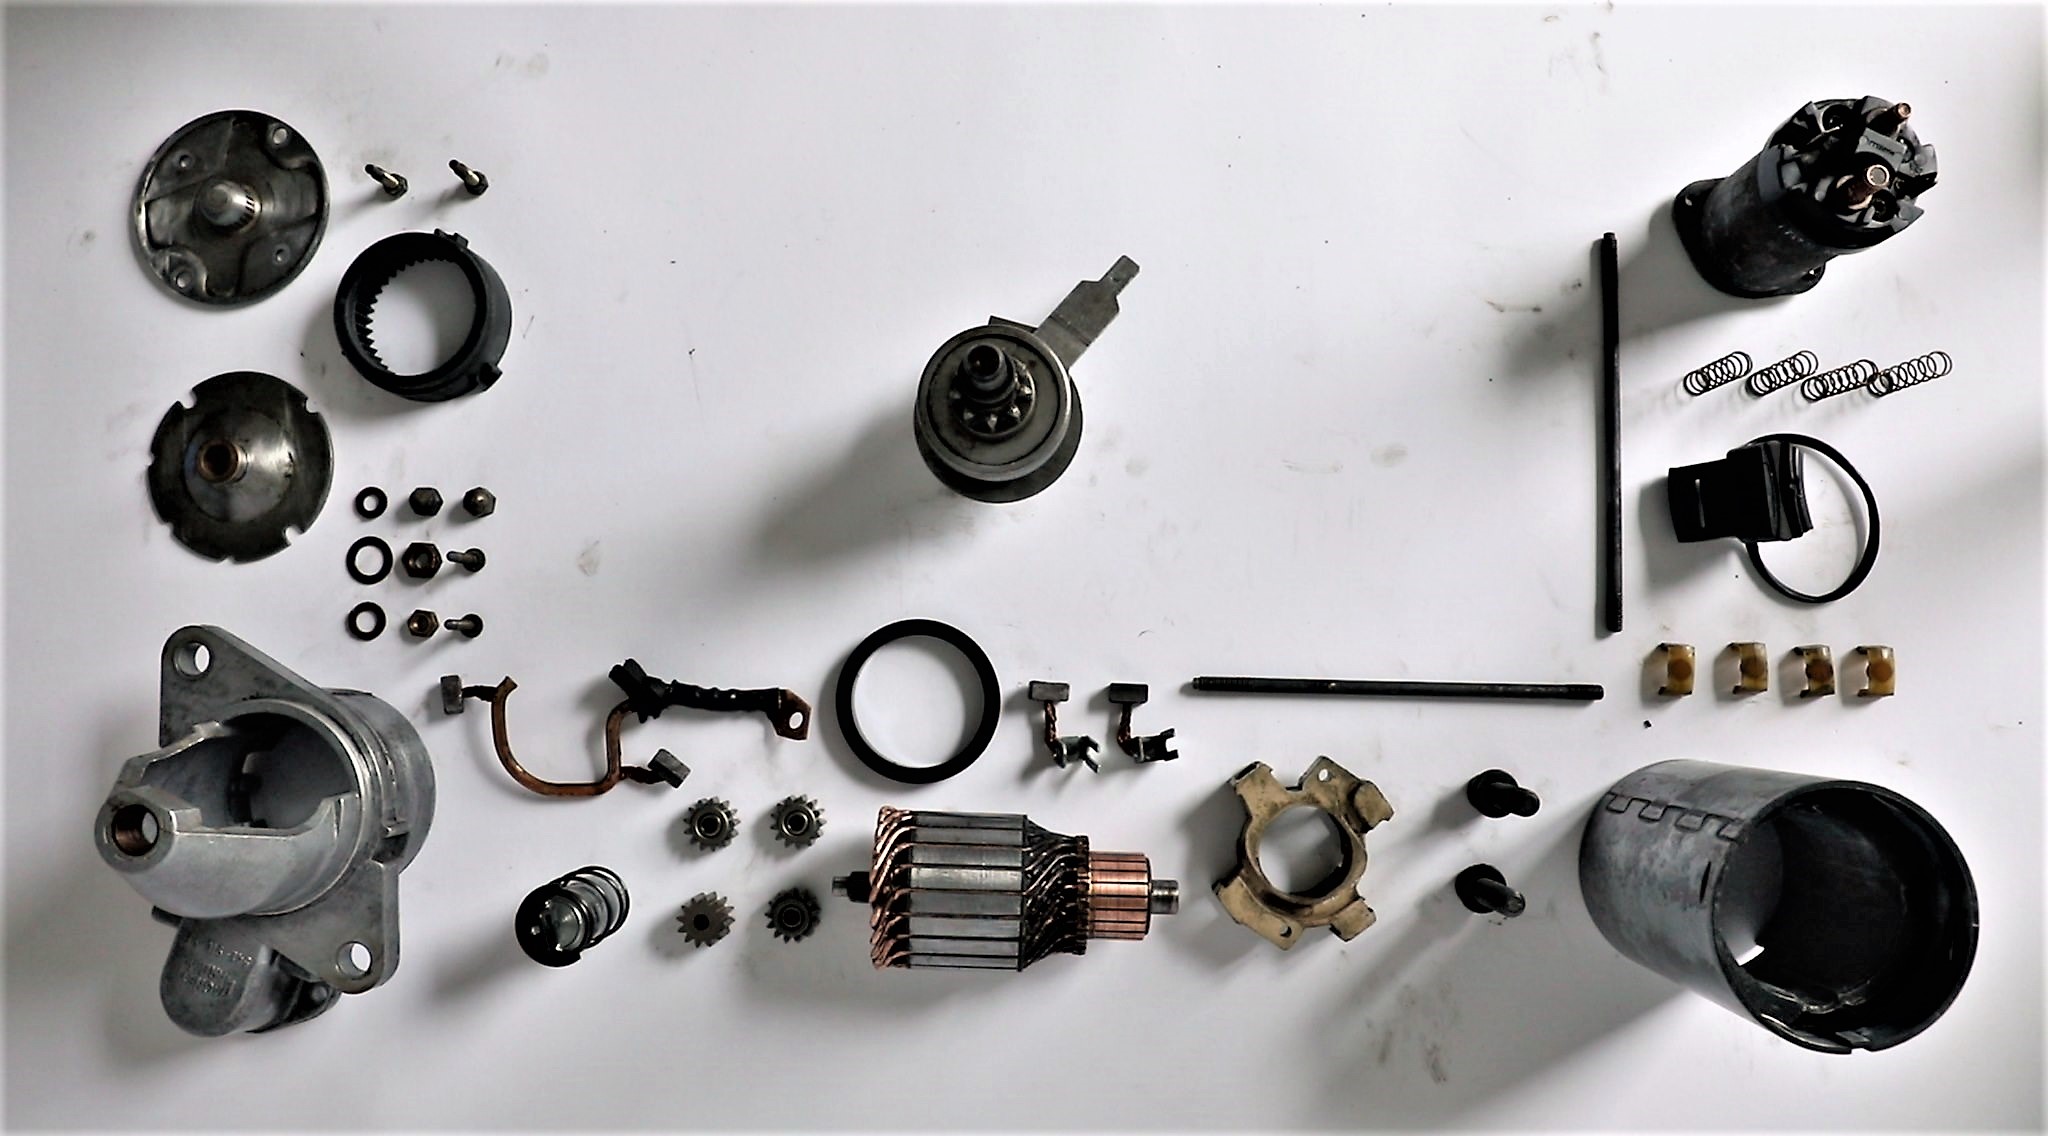
I am not sure if I'd ever be able to put it back together if I did it all at once.
So, we'll stay true to our "roadside repair" option and do things in stages.
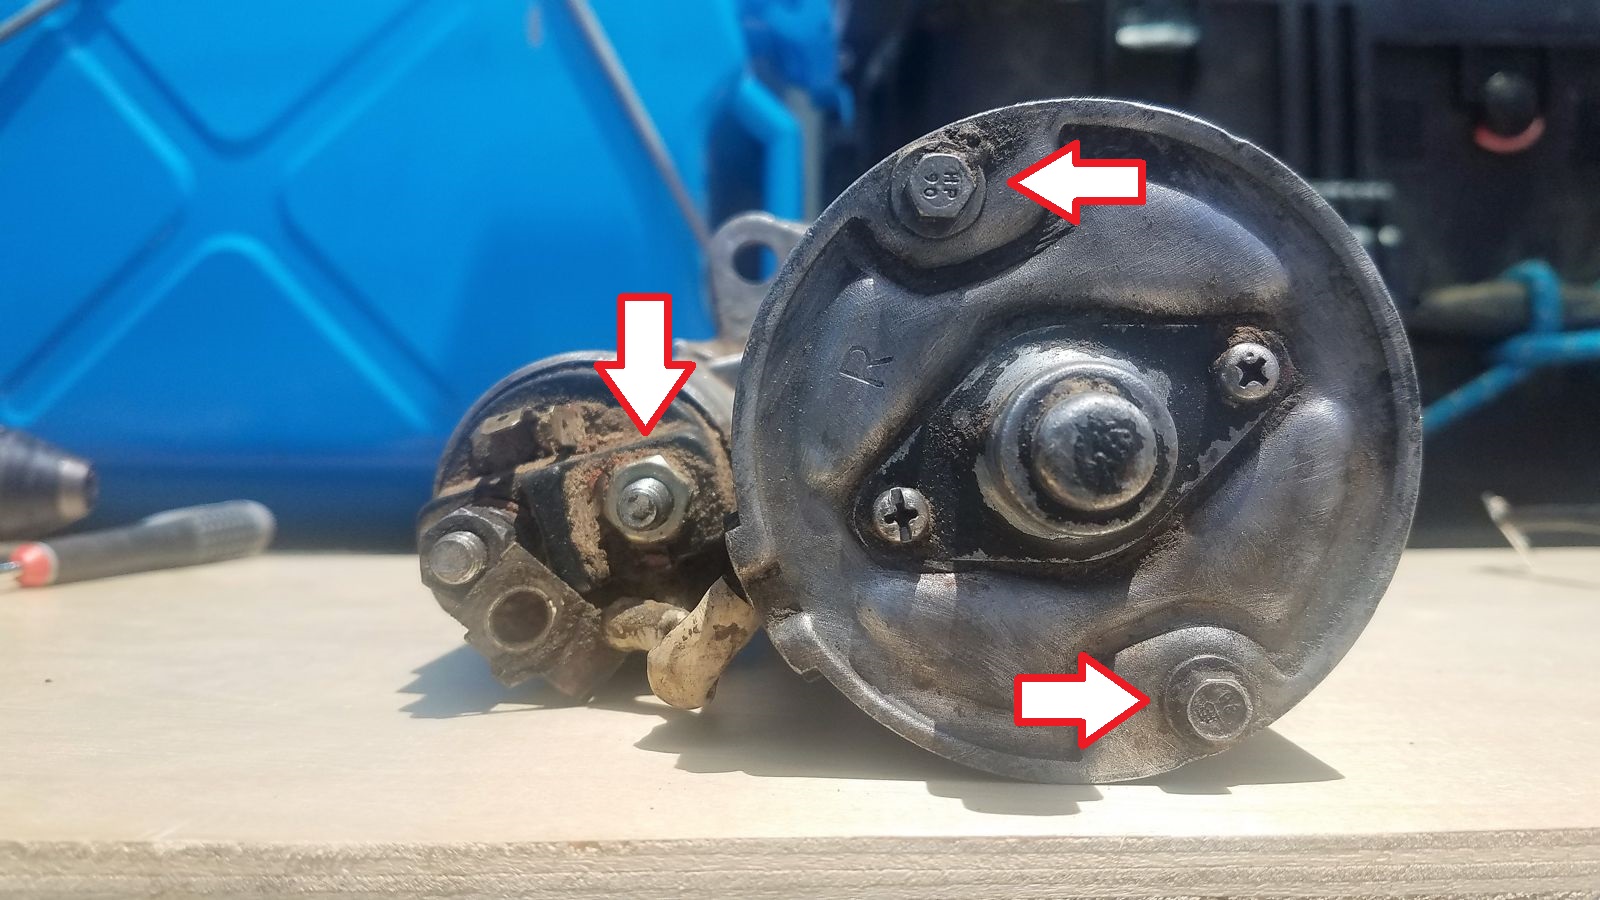
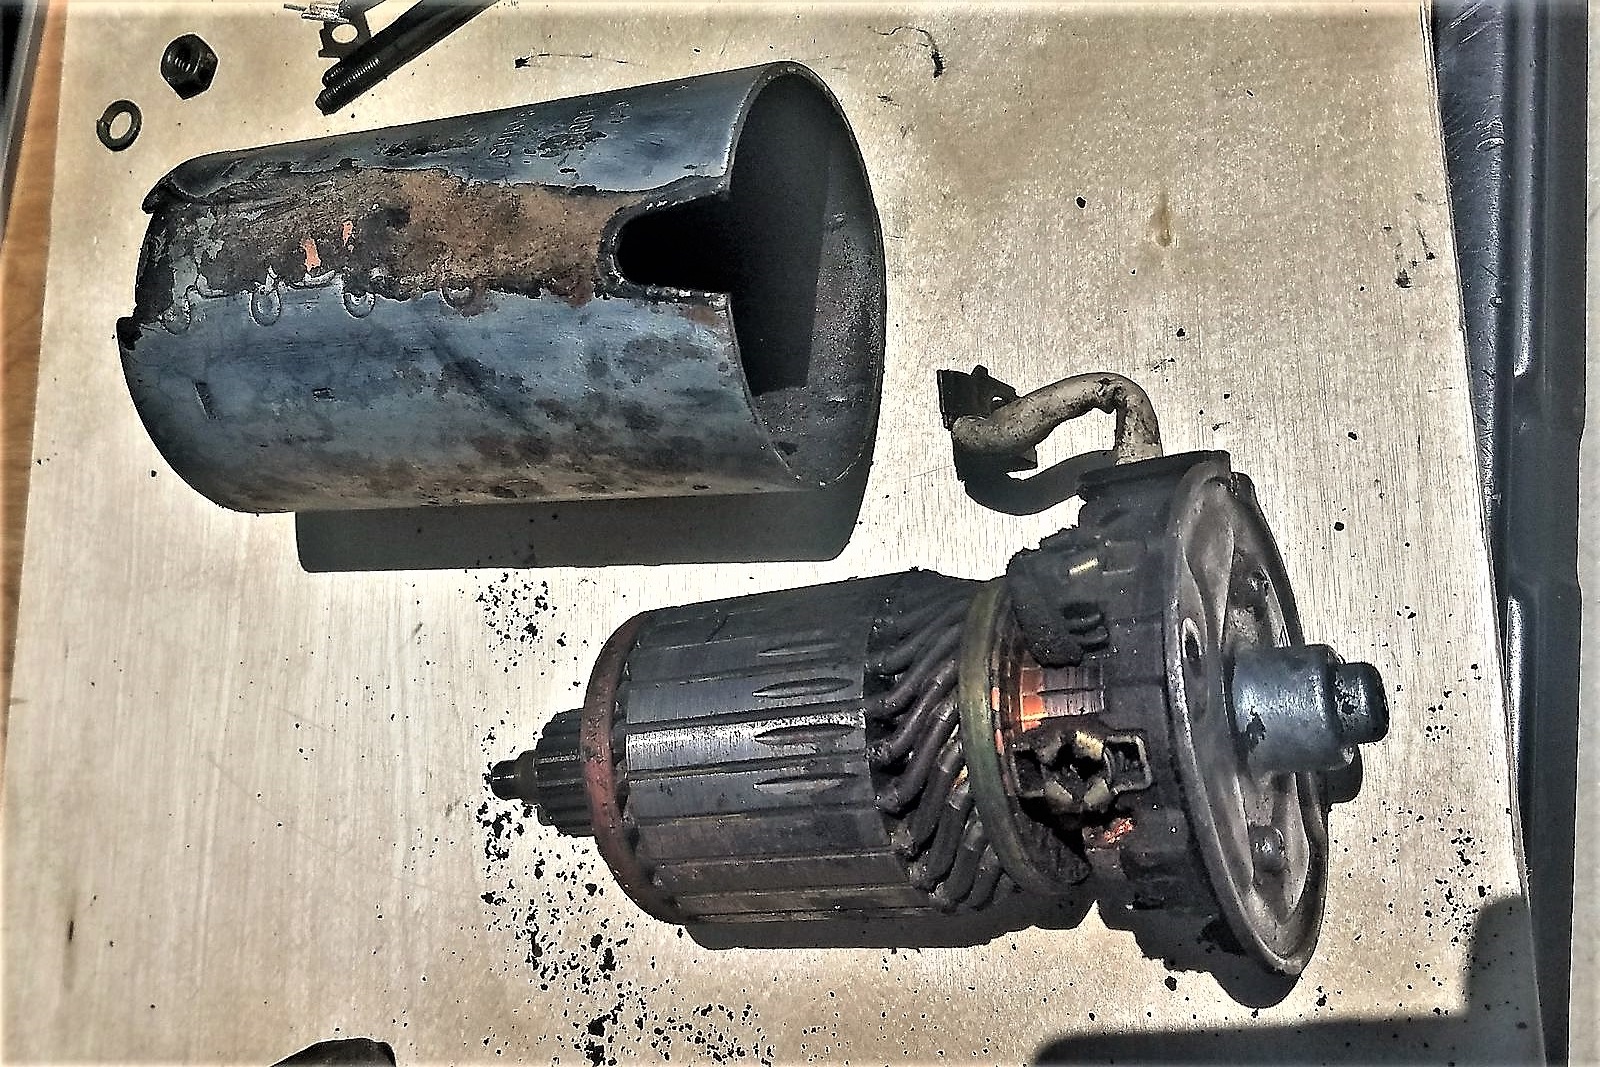
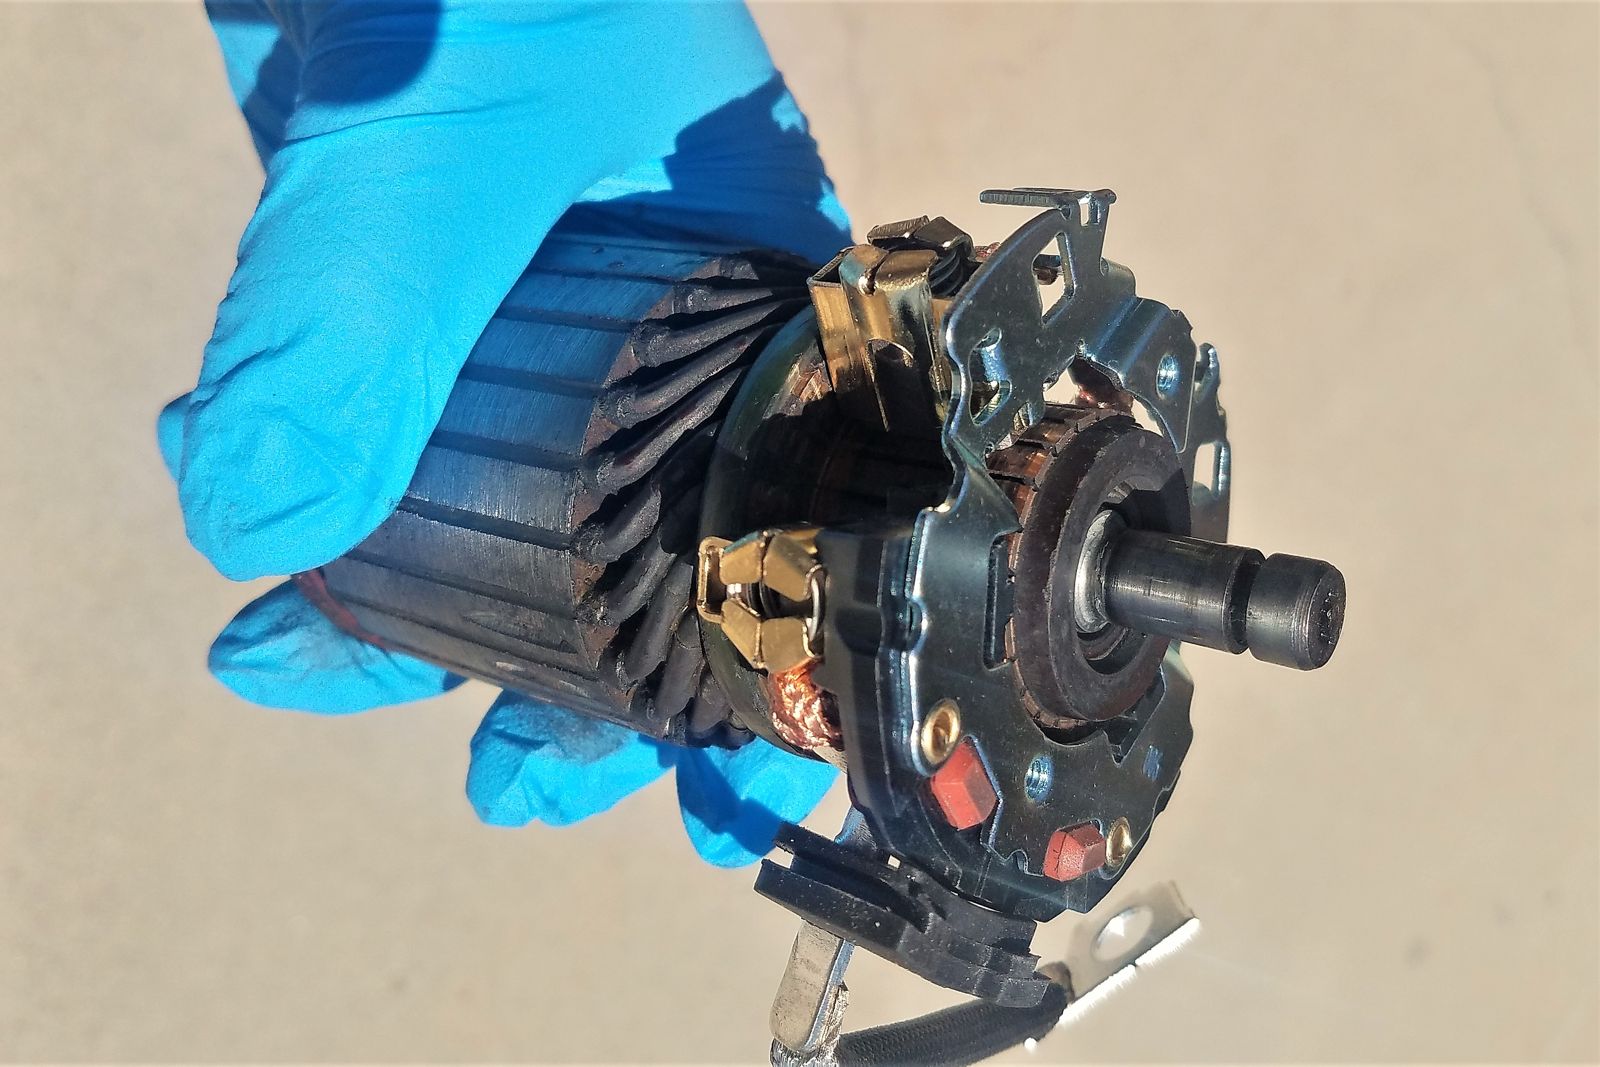
The first thing that goes bad in nearly any electric motor is brushes. To get to them, we need to remove the rotor from the body of the starter (see photo below):
- Unscrew the 13mm nut (12mm, 1/2", or 14mm) holding the fat wire to the terminal of the starter solenoid near the starter body (shown by downward arrow);
- slacken but not remove two Philips screws holding the bearing cover; and
- unscrew the 7-mm hex bolts from the back of the starter motor (shown by horizontal arrows).
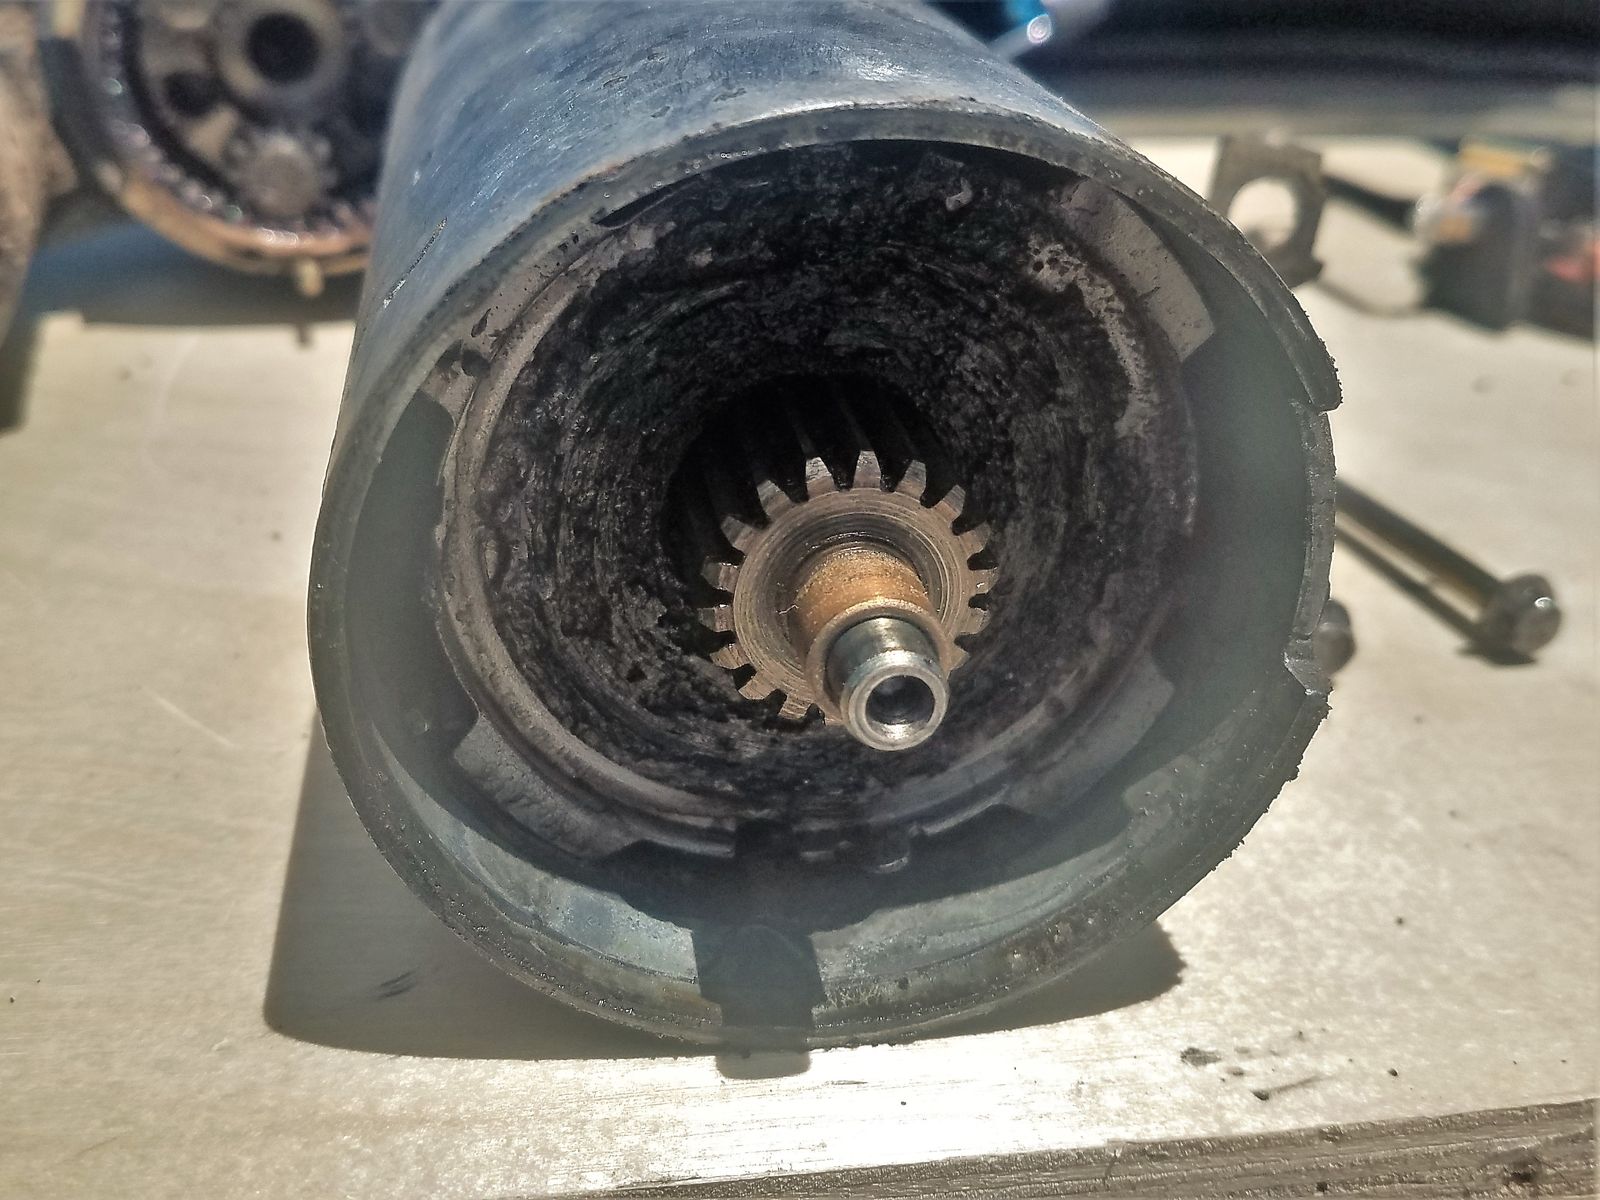
Now, try pulling the rotor together with the back cover out of the cage. Most likely, the cage will leave premises
along with the rotor - no big deal, but remember how everything fit together: there's a plastic part between the cage and
the planetary reduction gearset, and they only come together one way.
Depending on how crusty your starter is, you may have to use that flathead screwdriver and a hammer to separate the back cover from the cage. Don't go full gorilla, though - you don't want to bend the cage and have the magnets fall off.
Otherwise, pull the rotor with the back cover from the cage - magnets will resist, but you will persevere:
Twenty bucks say the cage will be full of nasty crud, composed of grease, motor oil, dirt, and fine dust from the brushes. Take your time to clean up the cage, at least to some extent.

It would not hurt cleaning up the "underside" of the cage, where a stamped steel piece separating the rotor from underlying plastic will likely be full of the same nasty mud. Again, remember how that stamped steel piece was sitting in relation to the cage and plastic underneath.
Now, let's work on the rotor.
Unscrew the two philips screws holding the "very back cover" to the back cover, and gently pull it off. You will be looking at the tail rotor bearing, and it will have a C-clip holding the rotor to the back cover and often a spacer washer. Remember how these were put together, and remove:
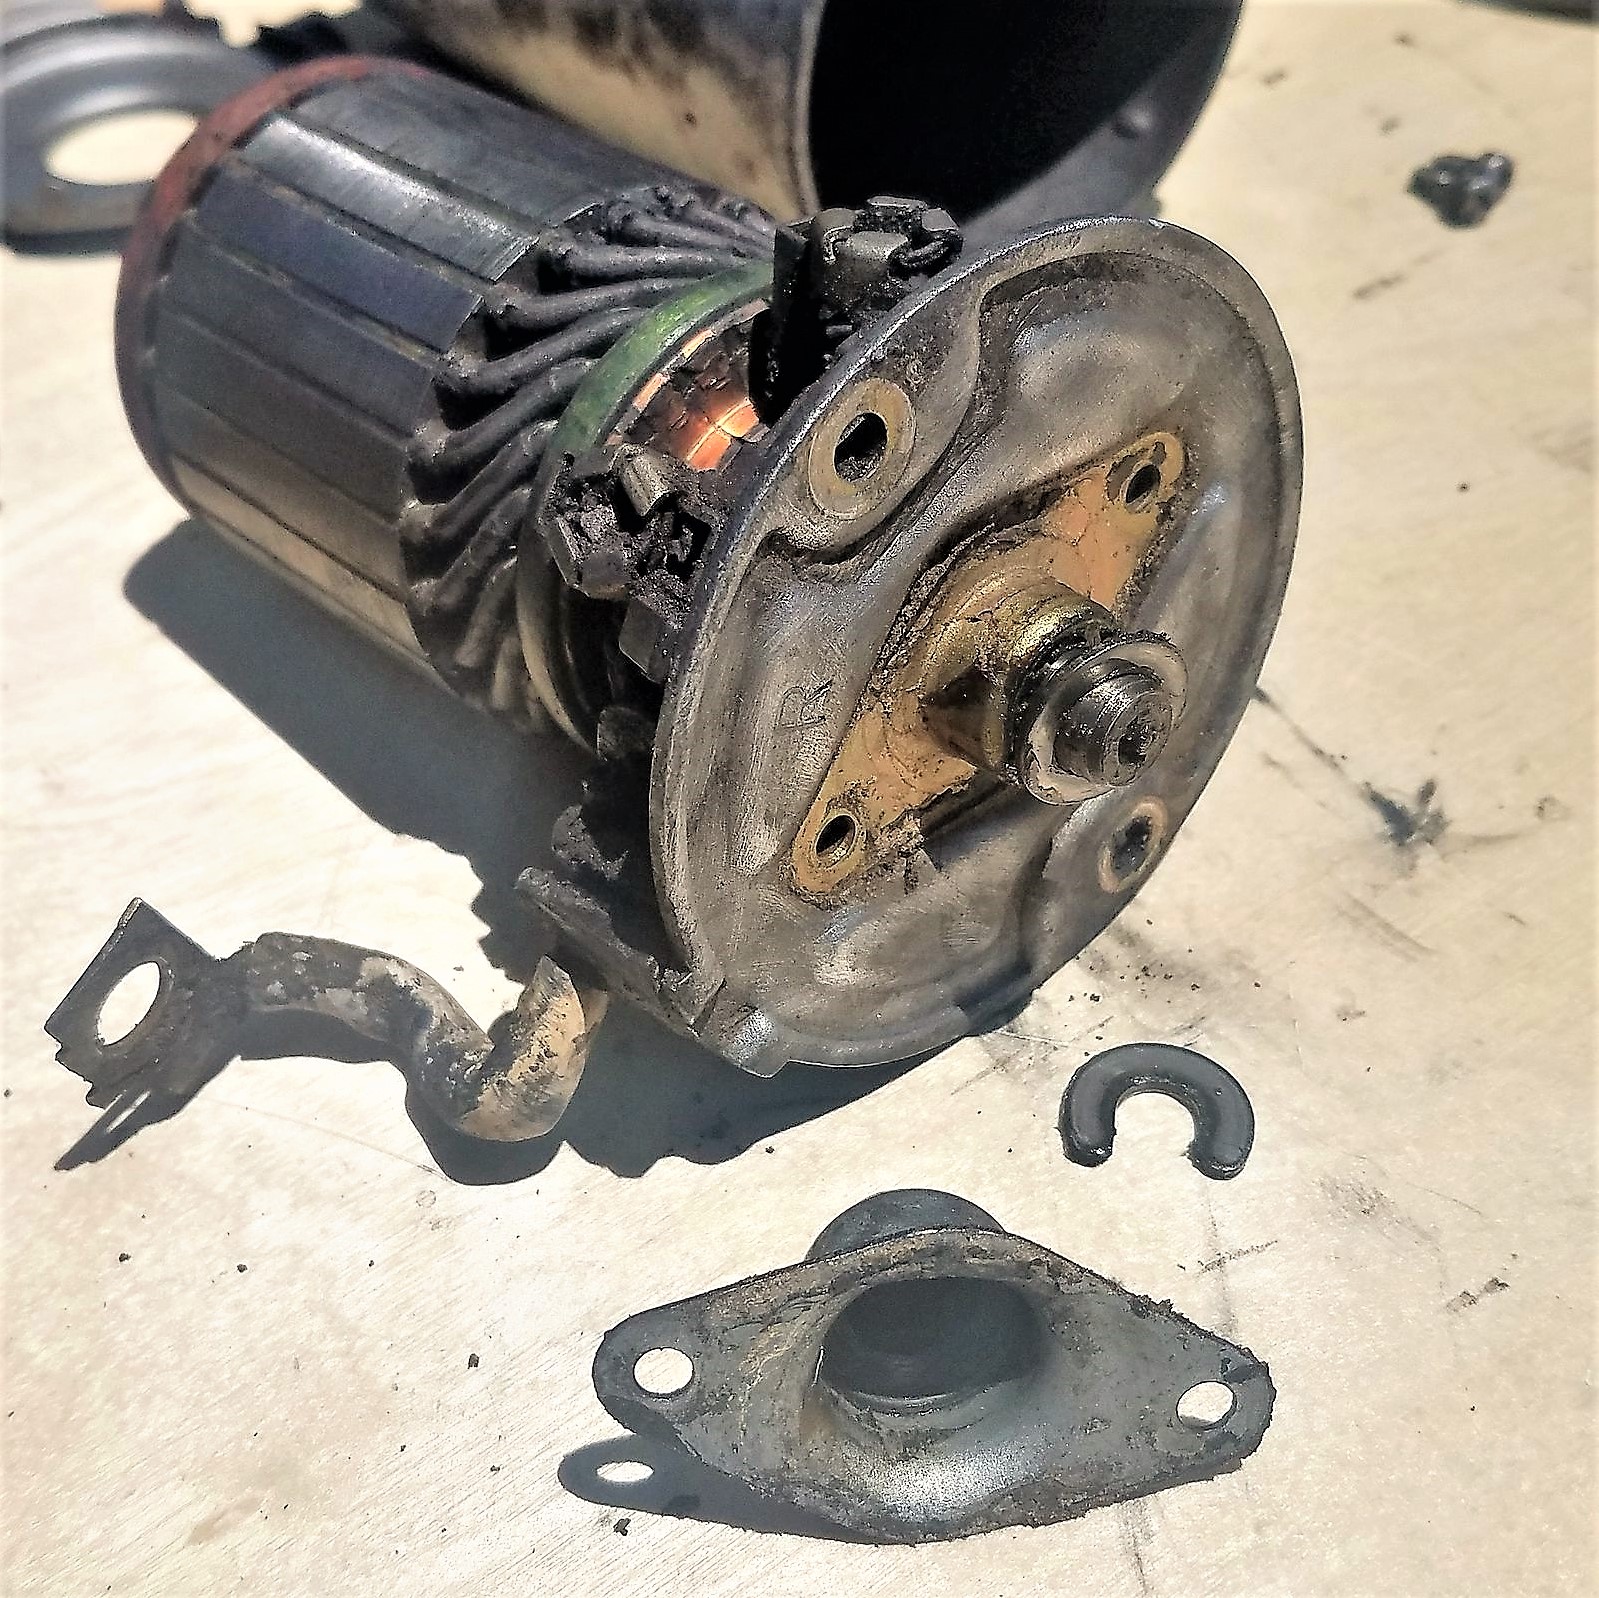
As everywhere else, it wouldn't hurt to clean up these parts.
Now, with the C-clip and spacer washer out, you can slide the back cover off the rotor, and then - the brush holder unit off the commutator ring of the rotor.
This picture gives you an idea of what nasty old brushes look like near shiny new ones; I should mention that there was barely 5-6 mm of old brushes' length holding them inside the holder.

The shiny new unit on the right came from Maniac Electric Motors. There are at least two different part numbers and the units look differently, but they are interchangeable (which is kind of hinted on by Manica's website), despite a ~ten-dollar difference in price. The new brush holder comes with a plastic spacer that is super handy during the install.
Inspect the commutator ring of the rotor. If it has deep gouges on it, it probably won't last super long after the rebuild - but we're stuck on the side of the road, remember? - so we couldn't care less.
Clean the commutator ring as well as you can. I can't advise using brake cleaner for these parts - it may just dissolve the insulation on the wires, which would be bad news. But a shot of Everclear or even Popov's finest vodka is better than nothing.
And, finally, slide the new brush holder assembly onto the rotor. The plastic spacer in the middle will nicely glide the brushes onto the commutator ring.
Now, install the back cover on top of the brush holder assembly, put some fresh grease on the bearing surface, install the spacer and clip ring, and the "very back" cover. Install and tighten the Philips screws holding the rotor, brush holder assembly, and covers, together.
Slide the assembly into the cage with magnets, taking care not to band the steel core of the rotor against the magnets. Note that the plastic "V" insulating the fat wire going to the rotor from the cage must fit nicely into its cutout in the cage.
Install the steel separator at the bottom of the rotor (if it fell out during disassembly), remembering its original placement. Coat the gear and bearing surface with fresh lube.
Install the front separator/cage/rotor/back cover assembly back on top of the gear reduction unit. Squeeze everything together without using excessive force (the spring inside the reduction unit will try to push things apart), slide in the long screws with 7-mm heads and dabs of Loctite on their threads, and tighten them up.
If your starter solenoid is awesome, pulls the gear in like no other, and sends hundreds of amps into the rotor without a hint of resistance, connect the fat wire from the brush holder to the closest 8-mm terminal on the solenoid, replace the lockwasher and nut, and tighten the nut with a 13-mm (or 12-mm, half-inch, or 14-mm) socket.
Guess what, you're done with repairs. I urge you to test your starter; this can be done conveniently but slightly dangerously using the jumper cables, your truck's battery, and a screwdriver or a wire with alligator clips. Connect the body of the starter with the negative battery terminal, and remaining fat terminal on the starter solenoid with the positive battery terminal, and then give +12V to the small blade terminal on the solenoid.
NOTE that when/if the starter motor starts, it will wiggle itself free from your hands when you apply the voltage (and roll along the road, likely shortening the jumper cables in process). So, either use a friend with gorilla arms and leather gloves to keep that bugger steady, or clamp it to a large wrench or a nasty board with rusty nails found on the side of the road using a large C-clamp or ratchet strap or bailing wire.
I can't offer a scientific method to tell if the starter is good or marginal. I can tell you that if it wiggles itself from your containment in a hurry, with a healthy gear whine in process, it is most likely good to go. After all, it can't be worse than it was, can it?
If you haven't tested your newish starter, you may discover later (e.g., after bolting it in the truck and having two congratulatory beers) that it still sucks. If you aren't into that kind of roadside entertainment, you may splurge for a new solenoid ($26 at Maniac Electric Motors), and replace it as well.
It only takes three Philips screws from the "forward" side of the starter (next to the "nose cone") - and a friend with gorilla hands to hold the starter, because these screws may be Loctited in place. You need to wiggle free the shaft with a rectangular window that normally engages with the fork (which pulls the gear in contact with the flywheel); it may or may not be super-easy, given the liberal tolerances of these things.
Whatever you'll have in your hands will look the same, just dirtier than, the new solenoid assembly: a coil with high-current contacts, a spring, and a steel plunger with that shaft with rectangular window. In my case, the old plunger was so coated with rust and grime that it was barely moving in and out of the solenoid. The new unit came with the rubber boot, protecting it from water ingress - neat.
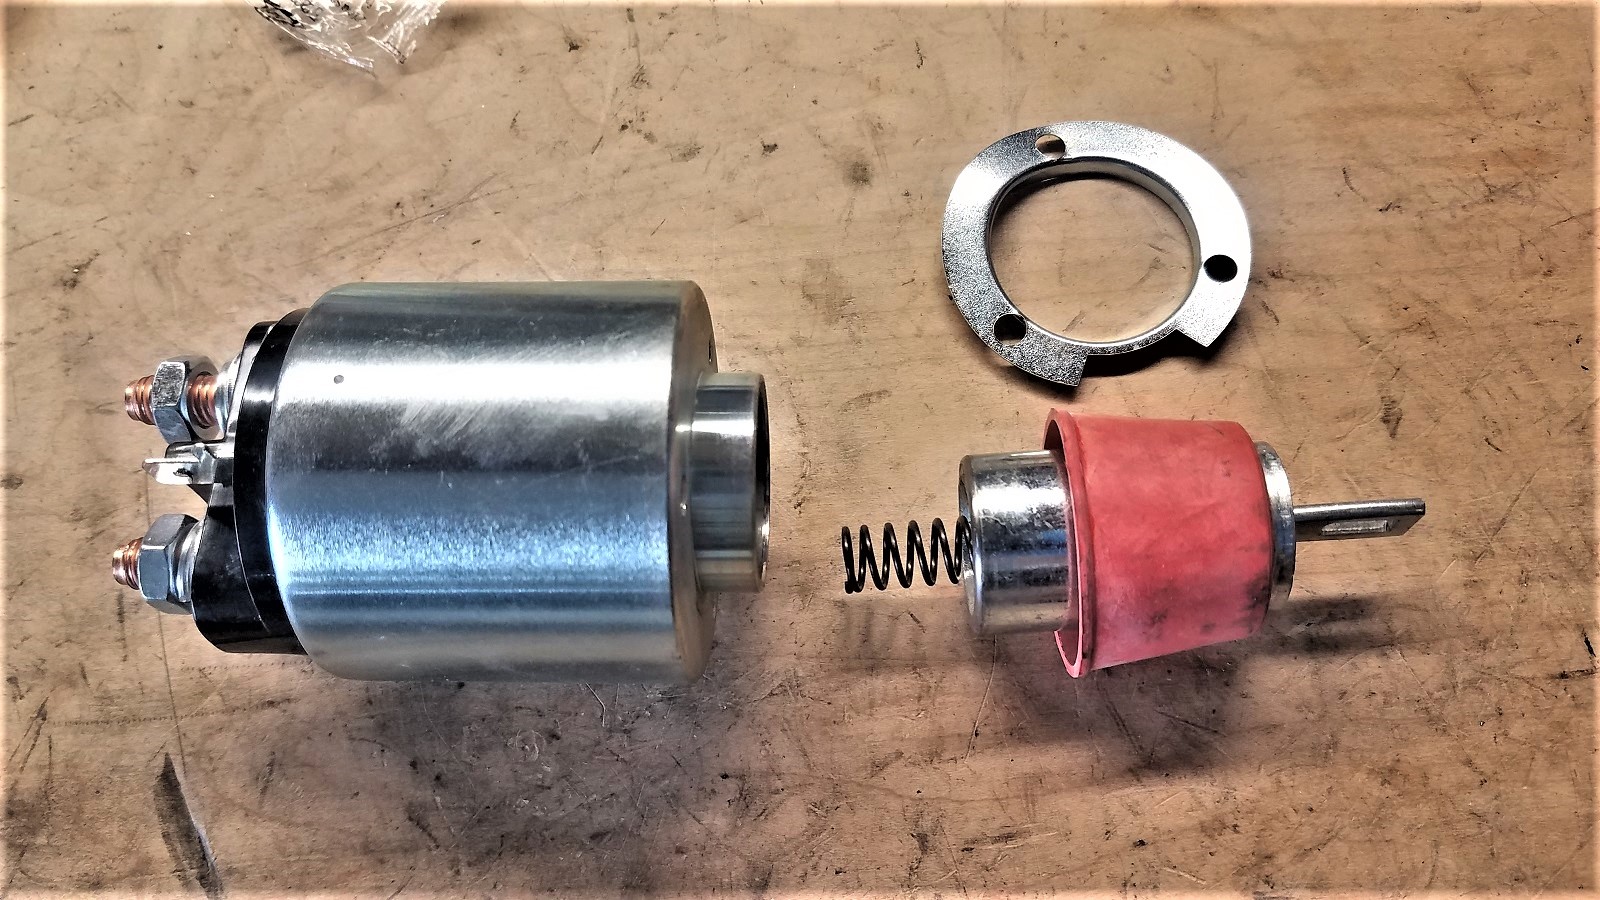
Wiggle the shaft of the new plunger onto the fork inside the body of starter, insert the spring, and slide the solenoid back over the plunger. Install the screws, putting a dab of Loctite on the threads.
Connect the fat rotor wire with the shiny new terminal of the shiny new solenoid, and install whatever lockwasher and nut was holding it in place.
Boom, you're done.
Since we're doing the roadside repair here, you can retrace your steps to shove the thing back into its cave. Heat shield, 8-mm Allen bolts, yada, yada.
By the time you're done, you'll notice that, out of two and a half hours spent on that adventure, less than half an hour was spent on actually replacing the starter parts. It is yet another argument for keeping those in your spares kit.
However, here's where we get to some disclaimer-ish parts.
Look back at Sean Campbell's photo of a fully-disassembled starter. Do the rotor windings look okay to you? If not, I am with you and Sean. Something has been going terribly wrong inside that starter for a long time that drove the rotor far down its shaft. It may work for a while, but chances are that it'll result in a pretty catastrophic meltdown down the road. So this write-up does not cover the rotor replacement - which, by the way, is also sold by the same Maniac Electric Motors!
Also, not covered are the bearings - these are very simple brass shells that can indeed go bad and result in the starter's malfunction. I am certain the same company will gladly provide you with the bearings and whatever other parts you can see on Sean's photo. But here's where your return on investment begins to taper off: between the armature (rotor), brush holder assembly, and solenoid, you're within seven dollars from the price of a NEW starter from the same source.
If you are still not convinced in having a few parts at hand for a quick roadside rebuild, you belong in one of two camps:
- People who depend on the others to fix their junk and get them home, or
- People who, like me, lug around about 120 lbs worth of parts. But, at least, I am trying to improve!