This story began a few years ago, before the majority of my vehicles achieved junkyard candidate status.
If you're like me, every corner of your garage is taken by one or another Jeep or Land Rover part that you removed from your vehicle in hopes of future rebuild, or to chuck as a core in a parts store when another one bites the dust, or an already stashed replacement.
Chances are, that part is an alternator. In my case, when we sold the house and bought another, and moved the stuff to the new one, I found FOUR Land Rover alternators, of not quite clear provenance or in not quite clear working condition. One of them was lovingly rebuilt by Automotive Exchange and Supply in San Diego, three remaining were core candidates.
Every time I am about to chuck one in the trash bin, I picture a face of some poor kid far away, winding these coils in the dim overhead light, for not even a drink a day. Since I am not currently in the need of a working alternator (picture this, in 5 Land Rovers in the immediate and 3 more - in the extended family), I decide to just rebuild one, or two, or all of them.
In the old past, I have rebuilt Bosch - and with lesser success, Lucas - alternators; this time the pile was composed mostly by Magneti Marelli units, used in 1995 Range Rover Classics, 1994-1999 Land Rovery Discovery, and in 1995-1999 P38A Range Rovers. Most of them were not-quite-dead-but-getting-there units, resulting in intermittent tachometer reading dropouts and unexpected hard starting in the morning. Most of them was subjected to extensive fine dust ingestion from trips to Utah and Death Valley, so it was natural to expect that the brushes should be the first thing to go.
Popped the back cover on one of them, and saw the integral voltage regulator/brush holder unit. Just like Bosch, I thought.
Finding a replacement online turned out less than easy, and not entirely successful. British Parts of Utah had a unit in stock, and it found its way to my doorstep a few days later. Down in the garage, I popped the plastic back cover, and proceeded to unscrew the old, ugly, and crusty, regulator. For whatever it's worth, you'll need an assortment of small metric nut drivers (including 5.5 mm), and a couple of Philips screwdrivers of different sizes.
After nearly stripping the nears of three screws that keep the regulator to the back cover of the alternator, I finally got the old one out. Time for the new, shiny, and beautiful, one to get back in.
WTF... The fat positive terminal on the rectifier assembly would not fit through the hole. And the rest of it doesn't quite fit.
I realized that I ordered and received a wrong part, and tossed both in the pile on the workbench.
At some point later, the tachometer needle dropped to zero on my 1996 Discovery, fittingly at the tail end of a trip to Death Valley - so I knew instantly the rebuild is back on schedule. But how come I had a wrong part?
Another Google search revealed a multitude of alternators Land Rover used in the same time span. The V-belt Range Rovers in 1994 used the old A-127 Lucas unit, while serpentine-belt Discovery in 1994 used - likely - a 100-Amp AMR3107 unit. Or was it a 100-Amp AMR4247, which was also used on early P38A Range Rovers? My situation was somewhat complicated by my use, over the years, of 120-Amp P38A alternators on my 1995 Classics and 1996 Discoveries. I know for a fact that at least two of them have a factory sticker on the side, proclaiming them to be 120A units, with part number AMR4247.
To further confuse the nomenclature, Land Rover Direct would sell you a part with this brief description: "Alternator A127 120amp part number AMR2938. This fits the Range Rover P38 V8 Efi engine."
Here's a photo of two alternators of very different vintage and provenance. To Land Rover's credit, both would physically fit and be electrically functional. Guess which is which?
To make our life even more exciting, this sticker - still attached to the unit on the left in previous photo - lists not one, but THREE part numbers: A127, AMR4247, and (Magneti Marelli proprietary) 63321353.

WTF.
It took quite a bit more Googling to discover a wonderful world of seemingly-interchangeable, almost-the-same, alternators made by Magneti Marelli, Bosch, Denso, and God knows who else. But, fortunately, most of them use one of two types of voltage regulator/brush holder units.
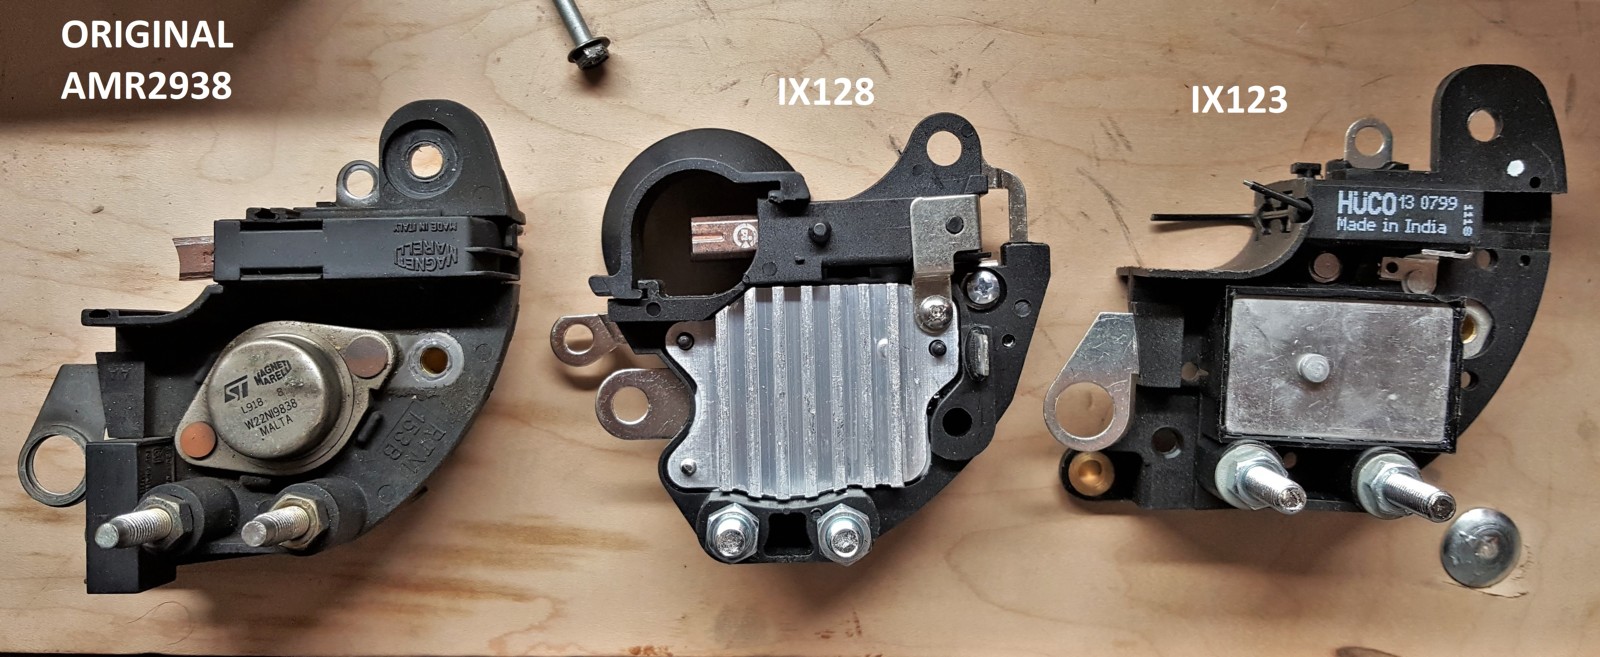
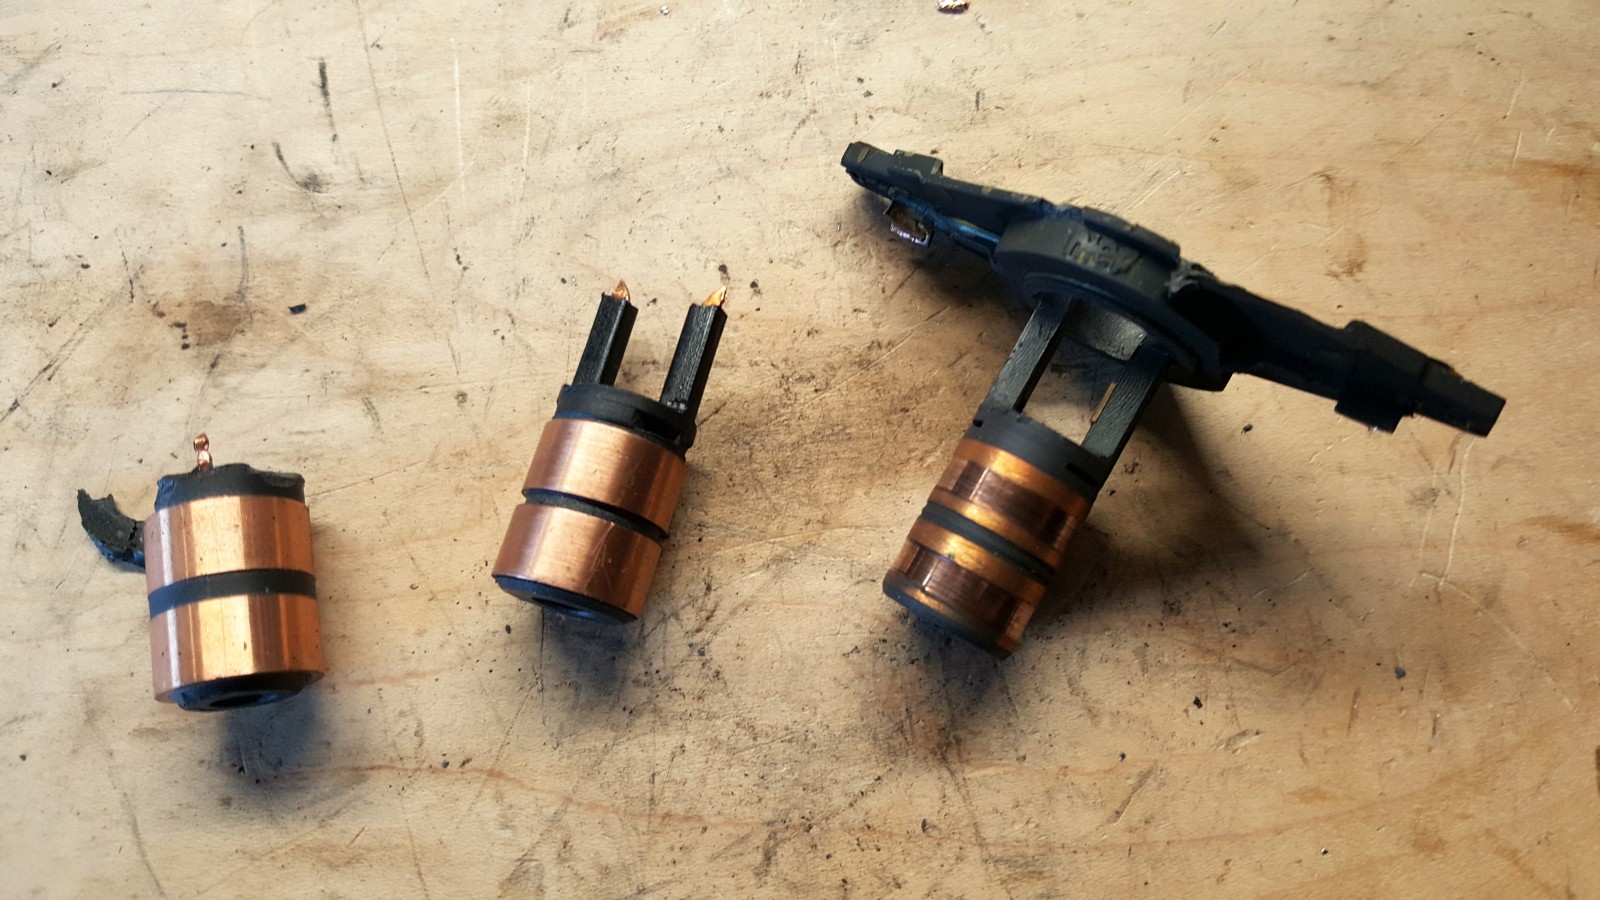
An aftermarket supplier, Transpo, labelled them IX123 and IX128, respectively. When I had them all at hand, I took a picture of the old regulator from my alternator, and two of these units.
At the photo above, the old unit that came from a 120A P38A alternator is at the left, the wrong IX128 - in the middle, and the correct replacement IX123 - on the right. Ignoring the removable brush cover on the IX128, you can see that they are not interchangeable.
At the time when I found and purchased a correct one, I stuffed it in one alternator from my stash, wrote "Good" on the side with a Sharpie, and put under the workbench without bothering to test it.
Fast forward a few months.
A regulator failed in my brother's 1996 Discovery (which I owned earlier), and I felt obligated to get him back on the road - so he came over and we quickly swapped in the shiny rebuilt alternator.
A couple of months later, my brother comes back with a really loud roar from the engine compartment, correctly identified as failed bearing in the rebuilt alternator. We yank it out, and put one together that seems to work.
We also disassemble the shiny rebuild, and find that the ONLY telltale signs of anyone ever working on this alternator are the bad solder joints between the stator coil wires and rectifier assembly.
Automotive Exchange and Supply did NOT bother to replace any other parts. The alternator had an old-style regulator unit and - out of rebuild!!! - worn next to nothing brushes, and either badly worn out or incorrect rear rotor bearing.
A further inquiry discovered that this place is even worse than Meridian in San Diego - at least Meridian manages to maintain about 50-66% of "working out of the box" rate for their power steering boxes. So much for farming that out.
Time for another Google search.
This time, it unearths a fantastic source: Maniac Electric Motors. Among a million other things, these guys would sell you anything from a complete alternator to parts and kits to rebuild one, including the regulator/brush unit, front and rear bearings, slip ring, brushes, rear cover, and whatnot.
By the way, this kit, according to ManiacElectricMotors, fit a variety of alternators - including "Land Rover AMR3021, AMR3107, AMR4247 Marelli 063341353010, 54022543, 63321353, 63341353." So... Are you telling me that IX123 fits AMR3107? Because I have an AMR3107 unit using an IX128 regulator, right here on my workbench... In any case, it will likely work for a Discovery 100A alternator, or 120A unit from a P38A.
I just had to try it. This is what comes in the kit:

OK, rant over: time for work.
Disclaimer: this procedure applies to AMR2938 (A127?) alternators, but AMR4247 and other Marelli units should be similar.
Step 1: remove the alternator from a vehicle (if it hasn't been done yet). For a serpentine-belt 1995 Range Rover Classic or 1994-1999 Discovery 1, it involves four tools and a bit of fiddling. In brief:
- unlatch the top section of engine fan cowl and put aside.
- using a 1/2" or 13-mm wrench, disconnect the ground cable from the battery.
- using a long 15-mm wrench on the belt tensioner, relieve tension from the belt and take it off the alternator pulley. If you haven't done it before, grab a Sharpie and draw a belt routing diagram somewhere in the engine compartment.
- pop the plastic cover protecting the terminals (if it is still there).
- using a 1/2" or 13-mm wrench or socket, remove the nut on the fat termina on the back of the alternator and remove the cable.
- using a 10-mm wrench or socket, remove the nut on the middle terminal on the back of the alternator and remove the wire.
- disconnect the tachometer feed wire from the last terminal on the back of the alternator.
- using a 1/2" or 13-mm wrench and a 10-mm wrench or socket, unbolt the alternator from its bracket and remove from the vehicle.
- this is a clincher: if you don't remove the pulley, you won't be able to access and replace the front bearing. I use 15/16" socket with an air impact gun to take it off; if you don't have an air gun, you have some uphill battle in store.
NOTE:
Range Rover Classic and Discovery Series 1 alternators use 67-mm diameter pulleys, so if you are tempted to swap in a P38A unit, keep the proper pulley.
Step 2: disassemble the alternator.
- Locate an at least 40-watt (the higher, the better) soldering iron, plug it in, and set aside to warm up.
- Unscrew and put aside a 90-degree or straight adapter from the post to a flat lug for the tachometer output.
- Remove the back cover using an 8-mm nut driver.
- Remove the regulator/brush holder unit: use 1/2" or 13-mm wrench or socket to remove the nut and spacer from positive terminal of the rectifier unit, and whatever tools you have at hand to remove one 8-mm nut and three screws holding the regulator to the back cover of the alternator. If memory serves me correctly, you will need 5.5mm, 6mm, and 8mm nut drivers and a Philips screwdriver. These screws may be a royal pain to remove.
- Remove the rectifier diode assembly. In order to do it, two 8mm nuts and isolating cup washers under them will have to be removed; next, assuming you haven't forgotten to plug in a decent soldering iron, unsolder the stator coil wires from the rectifier assembly terminals. It helps to have a solder suction tool handy, if you know how to use one, and use a thin flathead screwdriver to pry apart the terminals as you melt the solder. I have personally not seen welded connection between the wires and rectifier assembly terminals, but it is possible.
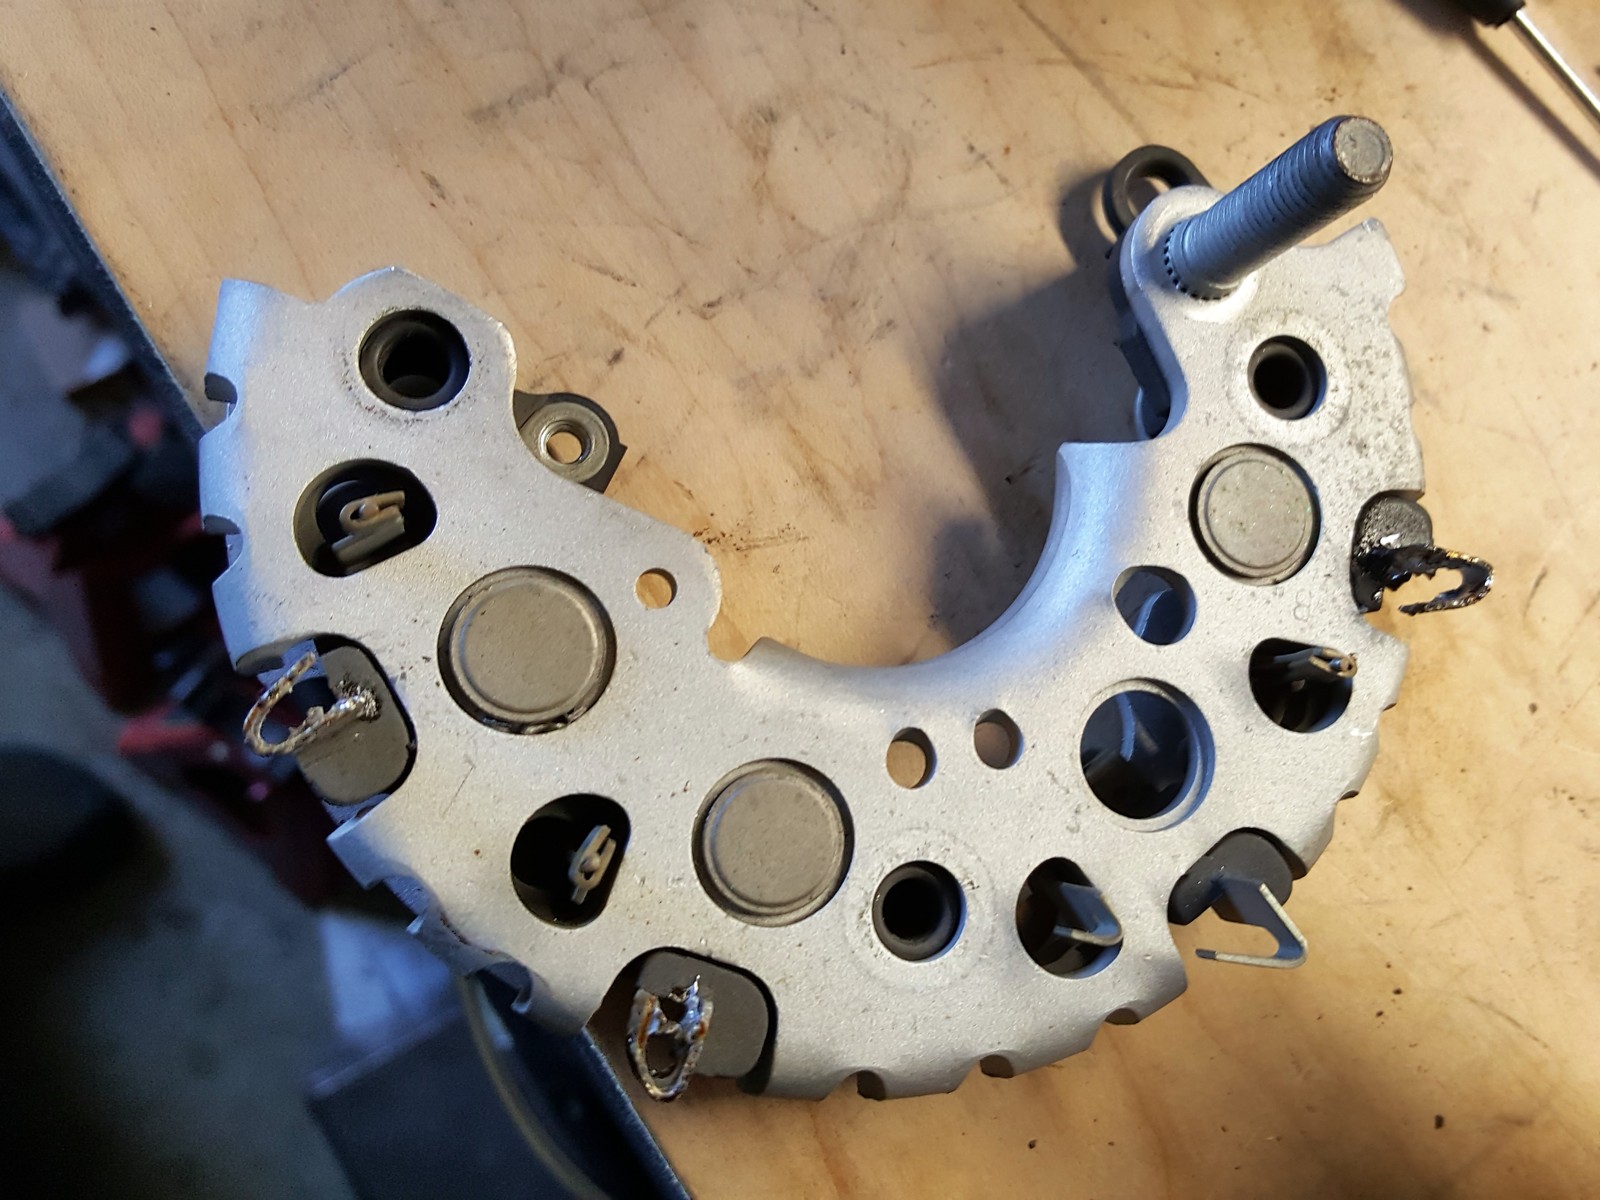
This is a picture of rectifier diode assembly removed from the back cover of the alternator. Note one missing diode and unused terminal - this is a rectifier from a 100-Amp unit, the 120-Amp unit will likely have four diodes - and four stator wires to disconnect from the assembly.
Since we're here and have the rectifier assembly out in the open, it would be prudent to check with an ohmmeter or diode tester to make sure the diodes are okay.
It is helpful to associate the rectifier terminals with their functions; the picture below shows which wires go where. The pair of diodes shown gray and "wired" to an unused terminal with an orange line is present in 120A alternators.

To check a diode with an ohmmeter or diode tester, the positive lead should be connected to the anode of a diode (a triangular arrow part on the schematic), and negative - to the cathode (a cross-bar at the tip of the arrow). If the diode is not burnt out, the ohmmeter should show resistance, and diode tester should show some voltage drop (about 0.5V for non-Schottky diodes). Now, connect the ohmmeter leads in reverse order to a diode - it should show infinite resistance (no continuity). If the reverse resistance if not infinite or there is a rather small voltage drop in reverse direction, the diode is blown and has an internal short.
To apply this esoteric knowledge to the rectifier assembly at hand, the following has to check out:
| Positive Lead goes to | Negative Lead goes to | Voltage drop | Continuity | If not, what failed |
| + (8mm stud) | G (ground, back side of rectifier) | Unknown | Absent | One or more diodes shorted |
| G (ground, back side of rectifier) | + (8mm stud) | 1.0-1.4V | Present | Three or more diodes burnt out |
| + (8mm stud) | A, B, or C | Unknown | Absent | Top-side A, B, or C, diode shorted |
| A, B, or C | + (8mm stud) | 0.5-0.7V | Present | Top-side A, B, or C, diode burnt out |
| G (ground, back side of rectifier) | A, B, or C | 0.5-0.7V | Present | Bottom A, B, or C, diode burnt out |
| A, B, or C | G (ground, back side of rectifier) | Unknown | Absent | Bottom A, B, or C, diode shorted |
If you find an issue with any of the diodes, you can go ballistic and replace the one that died. I would rather replace the entire assembly - it's only about $20, give or take.
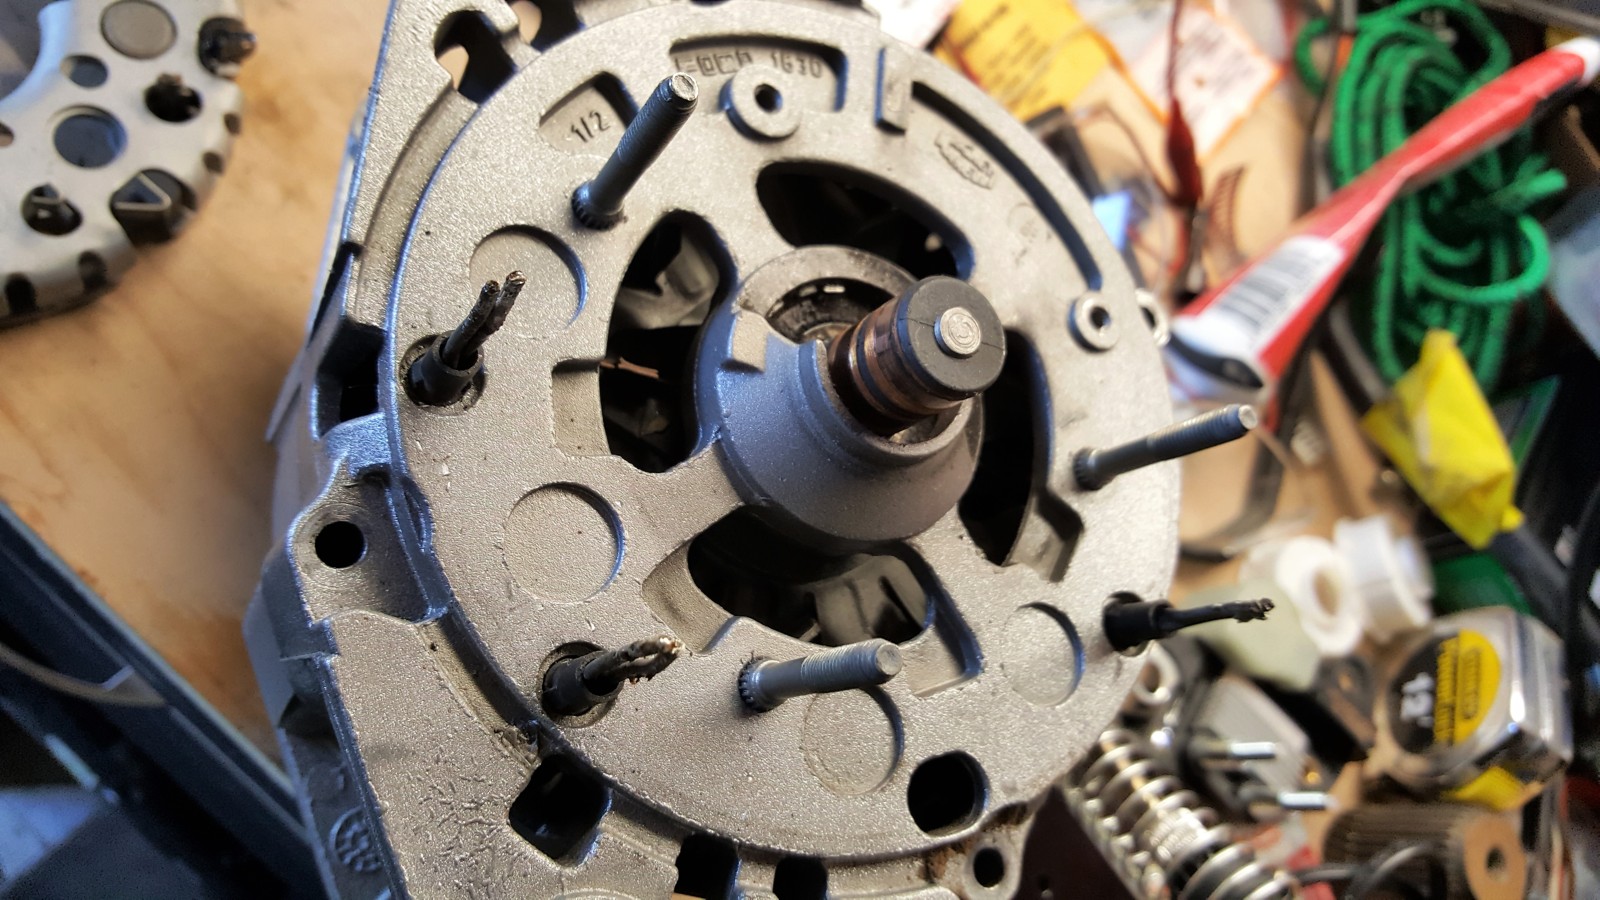
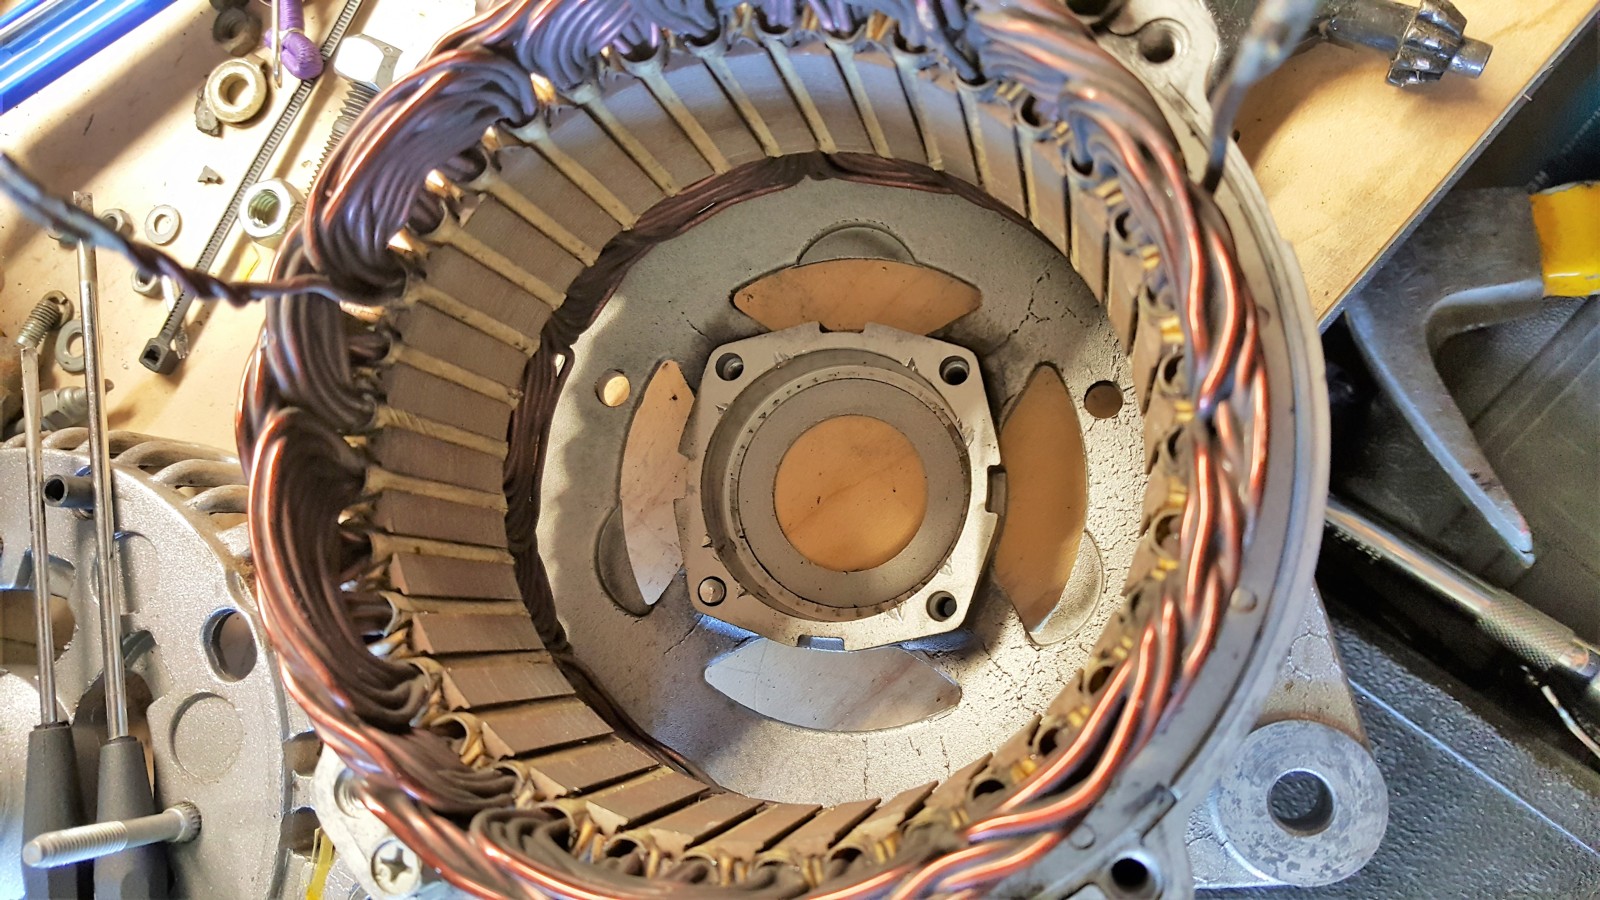
This is the back cover of the alternator, with stator coil wires protruding via insulating sleeves, and rotor slip ring visible in the middle.
- Remove the back cover: unscrew four posts using an 8mm nut driver with recessed center, and pry the cover off the front of the case.
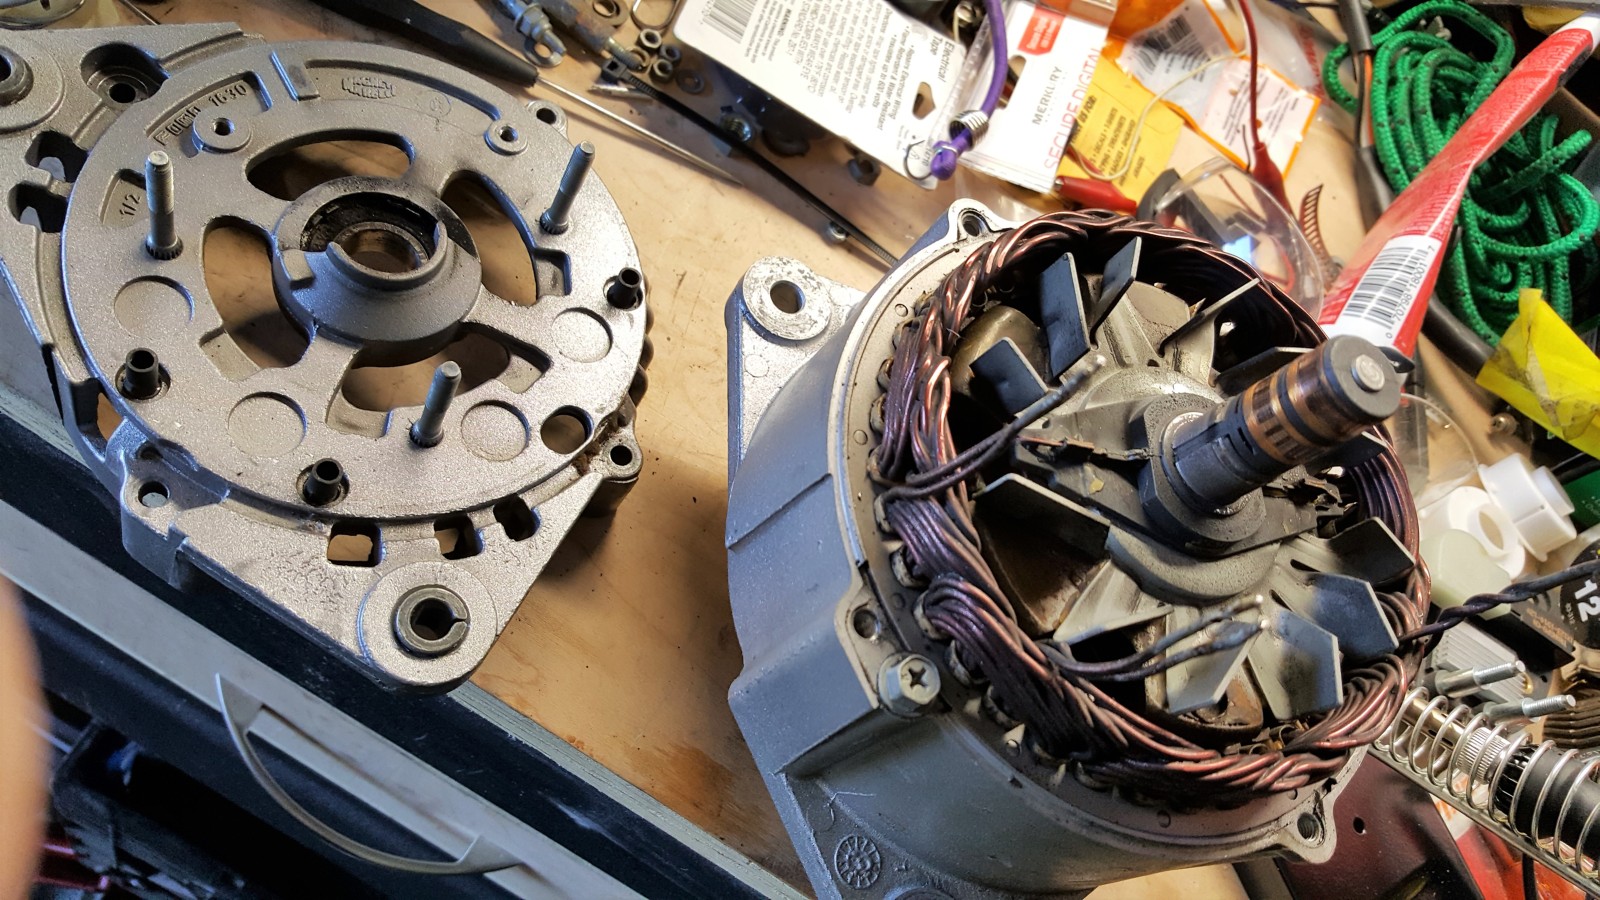
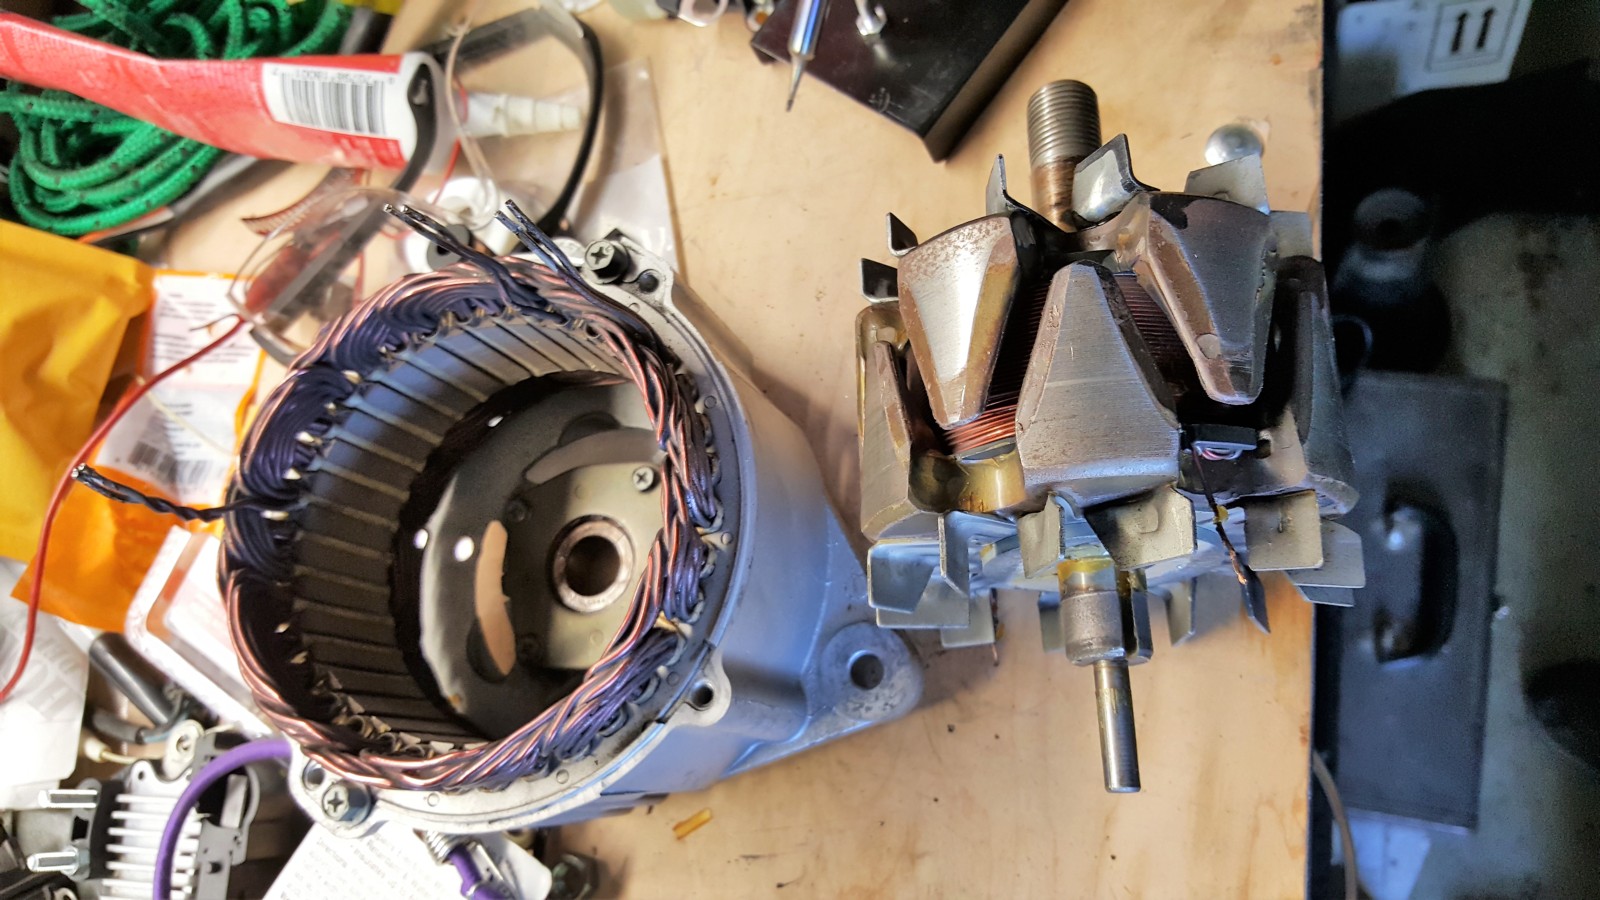
Here you see the front and back halves of the alternator separated.
Assuming you have taken off the pulley -
- Remove the rotor from the front alternator housing.
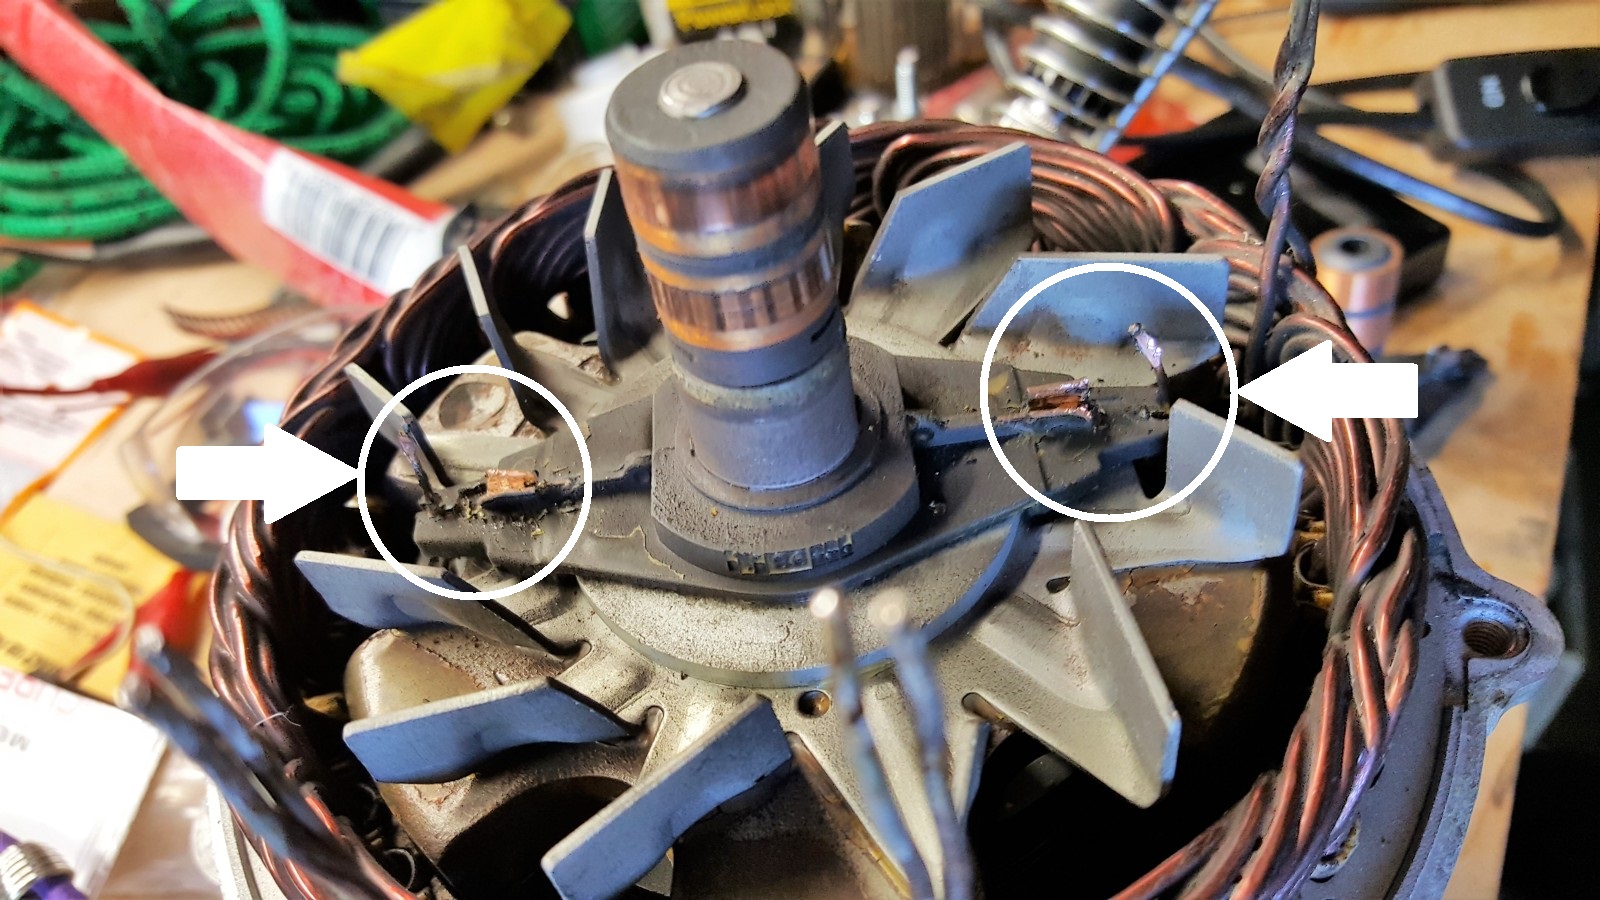
- Disconnect the rotor wires from the slip ring terminals - as indicated by arrows and white circles in the photo below. You can pry the terminals off using a thin flathead screwdriver.
- From the bottom of the front half-housing, remove the plate holding the front bearing. It has four Philips screws that may or may not have 6mm or 1/4" hex heads. It is a bitch to get them out - when I finally ruined one screw out of four, I simply drilled and left it out.
- Using a lightweight hammer and some random socket, pound the bearing out of its bore.
This is the bottom of the front half of the alternator housing with the bearing removed.
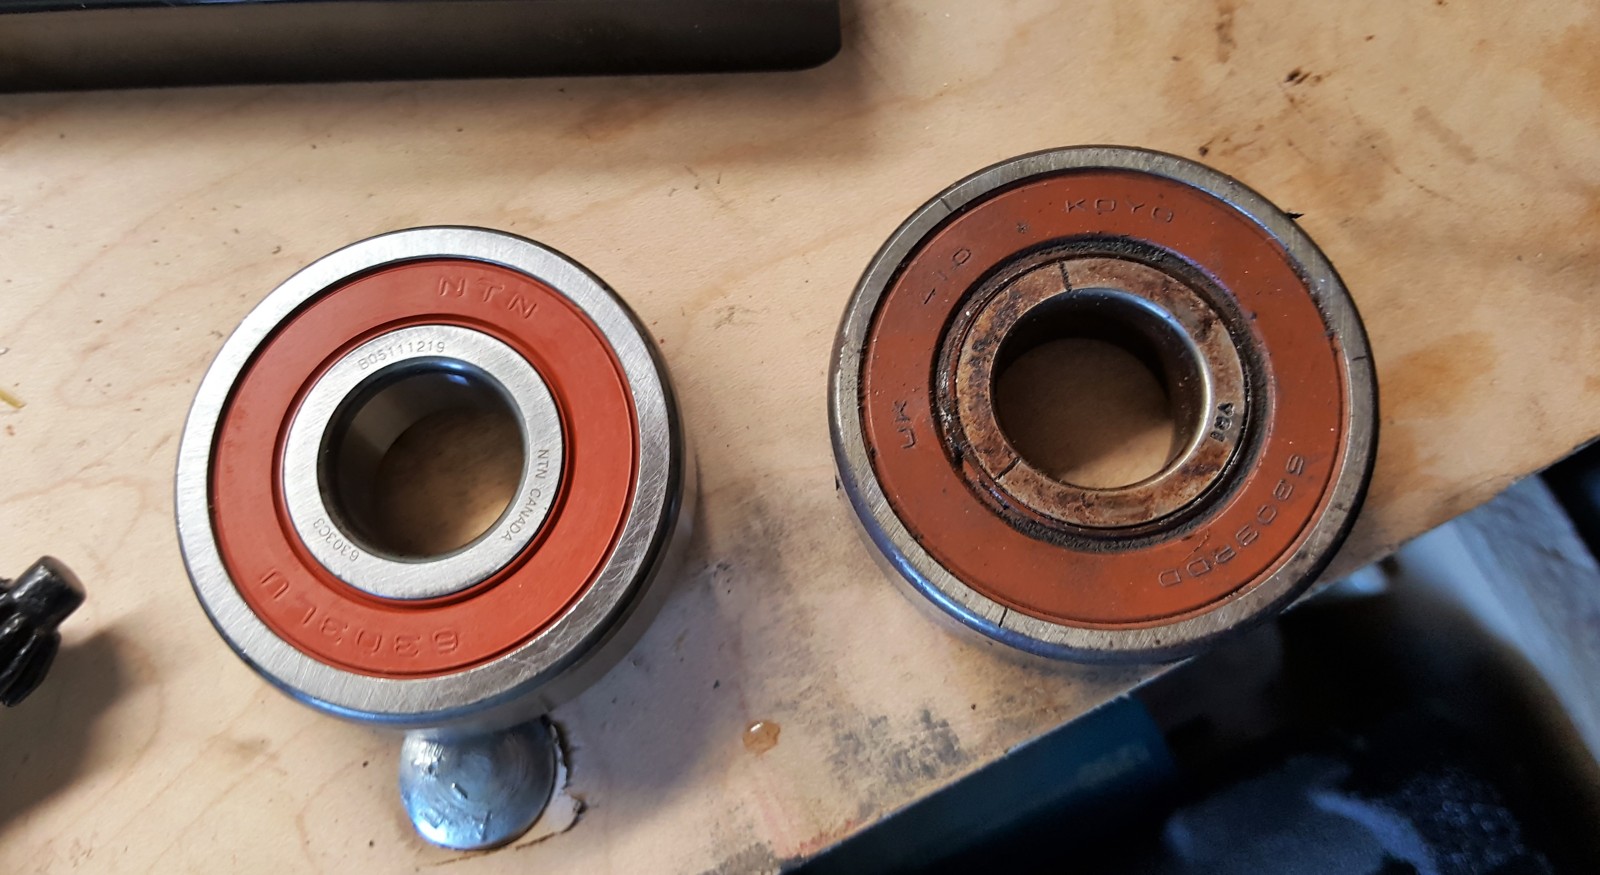
These are the old (right) and new (left) 6303 bearings side by side. The difference in size is only due to oblique angle of the photo.
Step 3: reassemble the alternator.
- Install the new bearing in the bore, and screw down the retaining plate.
- Replace the slip ring unit on the rotor. NOTE: you really don't have to do it.
I love the last item. It took me close to an hour, and two ruined replacement slip rings to achieve that.
Let me elaborate.
- Pry the old slip ring off the rotor shaft.
- Install the new slip ring on the rotor shaft.
- Insert the bare ends of the rotor coil into the slip ring terminals, and crimp them shut using needlenose pliers.
I also soldered them onto the terminals, using 95/5 tin/antimony solder with melting temperature of 240C (464F).
Back to the back half of the alternator housing:
- remove the rear bearing using a light hammer and a random fitting socket.
- Press in a new rear bearing using the same tools.
- Install the rotor in the front half-housing.
- Slide the back half-housing onto the rotor shaft, simultaneously feeding the stator wires into their respective insulators.
The last will also test your dexterity and patience. When the rear housing is fitted and bolt holes matched, spin the rotor inside the housing to make sure the rotor does not interfere with the stator wiring - this is important.
- Fasten the rear half-housing to the front, using the 8-mm nut driver. Spin the rotor again, to ensure it spins free in its bearings and does not catch on the stator and its wiring.
- Reinstall the rectifier assembly, feeding the stator coil wires into the corresponding terminal openings.
- Fasten the rectifier assembly using two 8mm nuts and insulating collar washers.
- Crimp the wires in the terminals using needle-nosed pliers, and solder them to terminals using high-melting-temperature solder (95/5 tin/antimony).
- Install the new regulator/brush holder assembly, and fasten it to the rear half-housing using the original screws (if you haven't rounded them off).
Don't forget to remove either a wire or a plastic cover keeping the brushes depressed in their openings; otherwise you'll be wondering how come you have a dead alternator with all new and shiny parts. Been there, done that...
- Install the stand-off and large nut onto the positive terminal of the rectifier assembly.
- Install the rear plastic cover onto the rear half-housing, and fasten with 4 nuts using an 8-mm nut driver.
-
Install a 90-degree or straight adapter from the post to a flat lug for the tachometer output.
Note: some IX123 voltage regulators have 6-mm-threaded post for the tachometer output, not 5mm as the other post. If you look closer at the photo of the back of the alternator, you'll see it; it means that the 90-degree adapter for the lug may not fit and you'll have to do something to it.
- Install the alternator pulley and tighten down the nut using 15/16" socket and air gun.
Lo and behold...
- Take the rebuilt alternator to a parts store for testing.
For whatever it's worth - O'Reilly can only test the alternator in YOUR vehicle, and our local NAPA no longer even does it. Which leaves... bolting it on.
Step 4: install the alternator into the vehicle.
- Position the alternator in its bracket.
- Feed the long bolts holding alternator to the bracket, and tighten them up using 1/2" or 13mm wrench and a 10mm wrench or socket.
- Attach the lug for tachometer output.
- Attach the field wire (typically it uses a captive nut) using a 10-mm socket.
- Attach the alternator output cable to the fat terminal using a 1/2" or 13-mm wrench or socket.
- Pop back the plastic cover protecting the terminals (if it was there before).
- Using the long 15-mm box wrench, apply the tension to the tensioner pulley nut and reinstall the belt. Verify the correctness of the belt routing!
- Reinstall and latch the top cover of the engine fan cowl.
- Reattach the negative battery cable to the battery and tighten up the clamp using 1/2" or 13-mm wrench.
And.........
- Start the engine!
- Verify the tachometer operation throughout a range of engine RPM.
- Verify the voltage across the battery terminals - at engine idle speed, it should be between 13.8 and 14.5 V.
I really, really, hope that the last three items check out for you. Otherwise, you might be inclined to return to Step 1. Otherwise, proceed to
- Grab a beer, if you have any left by now.
To me, one time the tachometer did not operate after an alternator rebuild - on a 1995 Range Rover Classic - and ended up being a tachometer issue. It took removal of the instrument cluster and replacement of tachometer with one poached from another cluster. But that's another sob story.
That is all.